Running a Code on Amazon Web Services (AWS)
Introduction
With the introduction of web licenses, it is now possible to run FLAC3D and 3DEC on a remote, potentially virtual computer (i.e., in the cloud). Web licenses will also be available for future releases of the other Itasca programs. The two most popular cloud services are currently Amazon Web Services (AWS) and Microsoft Azure. This document describes how to set up and use FLAC3D on AWS.
Amazon Elastic Compute Cloud (Amazon EC2) provides scalable computing capacity in the Amazon Web Services (AWS) cloud. You can use Amazon EC2 to launch as many or as few virtual computers as you need. Amazon EC2 enables you to scale up or down to handle changes in requirements, reducing your need to forecast computing needs. More information on Amazon EC2 is available on Amazon’s web site.
The content of this document is broken into the following major topics.
Set Up Accounts
Note
See Tasks that require root user credentials on the Amazon web site for details on Root account functions.
AWS assumes that the resources will be used by a company with more than one person. Therefore, it is best to first set up a Root account and then one or more sub-accounts called IAM s (Identity and Access Management). Operations for setting up FLAC3D to run on AWS can be done with an IAM account. Viewing billing information and other account-holder administrative tasks require root access.
Root Account
Follow these steps to set up a Root account.
- Open https://portal.aws.amazon.com/billing/signup.
- Follow the online instructions. You will need to enter credit card information to sign up.
IAM Account
With a Root account established, it is recommended to set up an IAM account per user. A company with several employees using AWS will likely set up multiple IAM accounts under one Root. The following instructions describe how to set up a first IAM account.
- If not already logged in, go aws.amazon.com, click Sign In to the Console and log in as the Root user.
- Go to the IAM Console (https://console.aws.amazon.com/iam/)
- In the navigation pane, under Access management, choose Users and then choose Add user.
- For User Name, enter Administrator.
- Select the check box next to AWS Management Console access. Then select Custom password, and then enter a new password for the account in the text box.
- (Optional) By default, AWS requires the new user to create a new password when first signing in. Clear the check box next to Require password reset to allow the new user to reset their password after they sign in.
- Choose Next: Permissions.
- Under Set permissions, choose Add user to group.
- Choose Create group.
- In the Create group dialog box, for Group name enter Administrators.
- Choose Filter policies, and then select AWS managed - job function to filter the table contents.
- In the policy list, select the check box for Administrator Access. Then choose Create group.
- Back in the list of groups, select the check box for your new group. If necessary, choose Refresh to see the group in the list.
- Choose Next: Tags.
- (Optional) Add metadata to the user by attaching tags as key-value pairs. For more information about using tags in IAM, see Tagging IAM Entities in the IAM User Guide.
- Choose Next: Review to see the list of group memberships to be added to the new user. When ready to proceed, choose Create user.
- The Add User screen is shown with a link for logging in with the IAM credentials. Write down this link or email it by clicking the Send email link.
- Now click the Sign In to the Console button, select the drop down menu next to the root name, and Sign Out.
- Click the link from Step 17 and enter the IAM username (“Administrator”) and password.
Key Pairs
AWS uses public-key cryptography to secure the login information. The user specifies the name of the key pair when launching an instance, then provides the private key to obtain the administrator password for the current Windows instance to allow logging in via Windows Remote Desktop (RDP). Set up a key pair following these steps. This task is performed once only.
Sign in to the IAM user account by clicking on the link from the previous section, or else go to aws.amazon.com, click Sign In to the Console and log in as an IAM user.
Open the Amazon EC2 console at https://console.aws.amazon.com/ec2/.
In the navigation pane under Network & Security, choose Key Pairs.
Choose Create key pair.
For Name, enter a descriptive name for the key pair. Amazon EC2 associates the public key with the name specified as the key name. A key name can include up to 255 ASCII characters. It cannot include leading or trailing spaces.
Note
By default, this is set to PuTTY format. If key pair with a .ppk extension is accidentally created, see this article to convert it to a .pem file.
For File format, choose the format in which to save the private key. To save the private key in a format that can be used with OpenSSH, choose pem.
Choose Create key pair.
The private key file is automatically downloaded by the browser. The base file name is the name specified as the name of the key pair, and the file name extension is determined by the file format chosen. Save the private key file in a safe place.
Security Groups (Optional)
Set up a Security Group that restricts access to instances to given IP addresses. To create a security group with the least privilege, follow these steps.
- Open the Amazon EC2 console at https://console.aws.amazon.com/ec2/.
- In the navigation pane under Network & Security, choose Security Groups.
- Choose Create security group.
- In the Basic details section, do the following.
- Enter a name for the new security group and a description. Use a name that is easy to remember, such as the account user name, followed by _SG_, plus the Region name. For example, me_SG_uswest2.
- In the VPC list, select the default VPC for the Region.
- In the Inbound rules section, create the following rules (choose Add rule for each new rule).
- Choose HTTP from the Type list, and make sure that Source is set to Anywhere (0.0.0.0/0).
- Choose HTTPS from the Type list, and make sure that Source is set to Anywhere (0.0.0.0/0).
- Choose RDP from the Type list. In the Source box, choose My IP to automatically populate the field with the public IPv4 address of the local computer. (On a network that allocates addresses in a range, specify the entire range, such as 203.0.113.0/24.)
- Choose Create security group.
For more information, see Amazon EC2 security groups for Windows instances.
Instances
Once set up, it is possible to launch one or more instances. An instance is simply a remote computer with Windows installed that can be accessed with Windows Remote Desktop (RDP).
Launching An Instance
- In the EC2 Console, go to Instances – Instances. Click the button to Launch Instance.
- Select Microsoft Windows Server 2019 Base.
- If a machine image is set up (see the section below, Amazon Machine Images (AMI)), click on My AMIs to select the existing image.
- Choose an Instance Type (see the table i Recommended Instance Types below for reference). Click Next: Configure Instance Details.
- Configure Instance Details. Leave these as default values. Click Next: Add Storage.
- Add Storage. This is done to increase the storage capacity of the root drive. It is also possible to add one or more additional virtual drives (see EBS Storage). Click Next: Add Tags.
- Add Tags. This is optional and can be skipped. Click Next: Configure Security Group.
- Configure Security Group. Choose Select an existing security group. For the security group, choose the security group set up in the steps above to restrict the users of this instance to certain IP addresses. Otherwise, just choose Default. Click Review and Launch. Click Launch.
- Choose the key pair from the dropdown menu and click the box to acknowledge access to the pem file. Click Launch Instances.
- On the Launch Status screen, click the View Instances button at the bottom-right corner.
- The instance is now listed in a table. When the Instance State is running, and the Status Checks say 2/2 checks …, select the instance and click the Connect button.

- Click Get Password. Click Choose File and navigate to the key file (.pem extension). Click Decrypt password. When the password appears, click just to the right of it to copy the password to the clipboard.
- Click Download Remote Desktop File. Open the file, click Connect, paste in the password and click OK. Click Yes to ignore the certificate warning.
More detailed instructions are available on Amazon’s web site.
Stopping An Instance
Closing the Remote Desktop session will not stop the instance. To terminate the instance, go to the console, click on the running instance, and choose Actions -> Instance State -> Terminate. To keep the instance for later, but not incur charges, choose Stop instead of Terminate.
Storage
Short term storage can use the root drive that is automatically set up when the instance is created. This drive disappears when the instance is terminated. But to use the same data across instances, EBS Storage (medium term storage of moderate sized files) or S3 storage (longer term storage of larger files) will be desirable. Details of these two options are described below.
EBS Storage
Amazon Elastic Block Store (Amazon EBS) provides storage volumes for use with EC2 instances. These are essentially like hard drives that can persist independently of an instance, so the same EBS for different instances (in the same region) may be used.
Initialize EBS Storage
Note
See Amazon documentation for instructions on creating an EBS volume outside of creating an instance. Make sure to choose the same Availability Zone as the instance. It will not necessarily be the default.
The easiest way to create a volume is during creation of a new instance (see “Launching An Instance” above) . After starting the instance, follow these steps to use the volume.
On the Windows logo, right-click and choose Disk Management.
The program should now ask whether to initialize Disk 1. Click OK. If this does not occur, right-click in the left panel for Disk 1 and select Initialize.
The disk should automatically be online as shown in the left panel. If this is not the case, right-click on the left panel and select Online.
Now, right-click on the right panel and select New Simple Volume… . Complete the wizard.

Mount Storage Volume On A Different Instance
Once a volume is created as above, it can be mounted on a different instance. This is an easy way to share data between instances (note that it cannot be mounted on two instances at the same time).
To mount an existing EBS volume on a new instance, follow these steps.
- In the EC2 console, in the navigation pane, choose Elastic Block Store, Volumes.
- Select an available volume. If the volume is already mounted to an instance, choose Actions, Detach Volume and then Actions, Attach Volume. If not, choose Actions, Attach Volume.
- For Instance, start typing the name or ID of the instance. Select the instance from the list of options (only instances that are in the same Availability Zone as the volume are displayed).
- For Device, keep the suggested device name.
- Choose Attach.
- Connect to the current instance and bring the volume online as described above (WARNING: Do not initialize the volume if it has data on it).
Detaching Storage Volume
If the instance is to be terminated, detach the EBS volume. Follow these steps before logging out of the current instance.
- While logged in, start the Disk Management utility.
- Right-click the disk (for example, right-click Disk 1) and then choose Offline. Wait for the disk status to change to Offline before opening the Amazon EC2 console.
- In the EC2 console, in the navigation pane, choose Volumes.
- Select a volume and choose Actions, Detach Volume. Click Yes, Detach.
Note
A detached volume persists after logging out. Charges continue to accrue for use of the volume until it is deleted. Persistent EBS storage volumes are useful for short term storage during a project. For long-term storage, moving data to S3 storage is recommended (see S3 below). After moving, the EBS volume may be deleted.
Deleting EBS Storage Volume
To delete the volume, In the EC2 console, in the navigation pane, choose Volumes. Select a volume and choose Actions, Delete Volume. Click Yes, Delete.
S3 Storage
Amazon Simple Storage Service (Amazon S3) is a storage service that costs significantly less than EBS (see i Storage Pricing below). This is a viable method for storing large files (such as FLAC3D save files) for long time periods.
On creation an AWS account is automatically signed up for all services in AWS, including Amazon S3. However, charges only accrue for services used.
It is possible to move files into and out of S3 storage using the S3 console. Instructions can be found on the Amazon web site. There are also many third-party programs that will make data transfer to S3 much easier. We recommend the Cyberduck program. Instructions for setting up and using Cyberduck are given below.
Access Key
To use Cyberduck, an AWS account access key is needed. Access keys consist of two parts: an access key ID (for example, AKIAIOSFODNN7EXAMPLE) and a secret access key (for example, wJalrXUtnFEMI/K7MDENG/bPxRfiCYEXAMPLEKEY). Like a user name and password, both the access key ID and secret access key are required to authenticate requests. Manage access keys with the same vigilance as is used for username and password.
Follow these steps to get the access key.
- Log in as an IAM user (see above).
- Go to the IAM Console.
- In the navigation bar on the upper right, choose the user name (Administrator), then choose My Security Credentials.
- Under Access keys for CLI, SDK, & API access, choose Create Access Key.
- Record the access key and the secret access key. The access key may be (re)retrieved later. But this is the only time the secret key may be obtained.
- To see the access key in the future, go to the IAM Console. Under Access management on the left, select Users. Select the name (Administrator) and then select Security credentials.
Find more information on access keys on the Amazon web site.
Using Cyberduck To Access S3 Storage
To use Cyberduck, follow these steps.
Download the Windows version from the Cyberduck website. Install it on the local computer.
Open the Cyberduck program and click the Open Connection button.
From the drop-down menu, select Amazon S3.
Enter the Access Key and Secret Access Key. Click Connect.
Note
Folders in S3 are known as buckets. Bucket names must be universally unique, therefore the operation might fail if the name is already taken by someone else (e.g., it is safe to assume any common name like “media” or “images” is unavailable).
Click Action – Create Folder. Enter the name of a folder and select the appropriate region. Click Create.
Click the Upload button to upload file and folders. Click Action – Download to download files and folders.
Start an AWS EC2 instance and follow the same steps except install it on the remote computer.
Storage Pricing
General Purpose SSD (gp2) EBS Volumes are $0.10 per GB per month, charged per hour. Standard S3 storage is $0.023/Gb per month. See for more information.
Full pricing details for EBS storage and S3 storage are available on the Amazon web site.
Amazon Machine Images (AMI)
Once software is installed and projects set up, it may be desirable to make an image of the instance. Down the line the image can be restarted rather than a new instance, which eliminates the need to install software and drives each time. An image may include one or more EBS volumes.
Creating An AMI
To create an AMI, start with an instance and install all necessary software (e.g., FLAC3D, Cyberduck, etc.) and add EBS storage drives as needed.
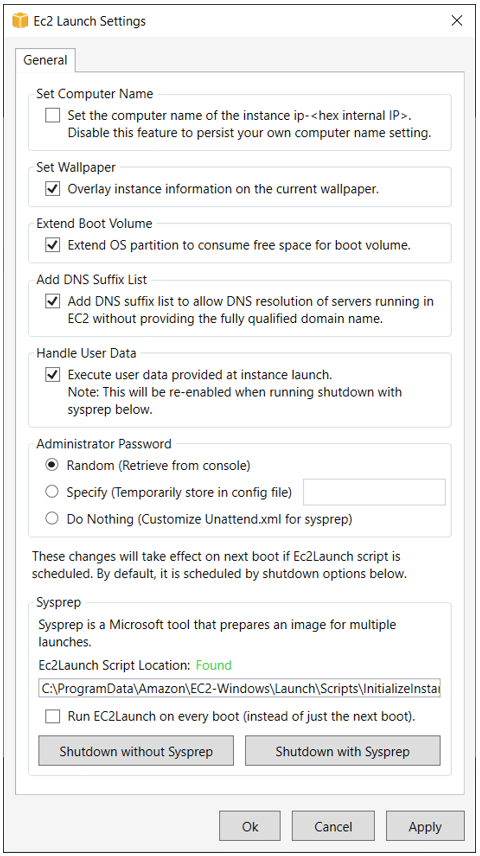
IMPORTANT – by default, when creating an AMI from an instance, each new instance created from this AMI will require the same Administrator password as the original instance. To prevent this from happening, follow these steps:
- In the open instance, in the Windows search bar, search for EC2Launch.
- Under Administrator Password, select Random.
- Click Shutdown with Sysprep and wait for the instance to become Stopped.
From the EC2 console, choose Instances and select the instance. When the Instance State shows Stopped, choose Actions, Image, and Create Image.
Specify a unique name for the image and an optional description (up to 255 characters).
Click Create Image. By default, Amazon EC2 shuts down the instance, takes snapshots of any attached volumes, creates and registers the AMI, and then reboots the instance. Choose No reboot to prevent the instance from shutting down. Warning: When choosing No reboot, AWS cannot guarantee the file system integrity of the created image.
While the AMI is being created, choose AMIs in the navigation pane to view its status (change the dropdown menu to show Owned by me). Initially, this is pending. After a few minutes, the status should change to available.
To launch a new instance based on the AMI, in the console go to Images – AMIs, select the AMI, and choose Launch.
Note there is a small charge to maintain an AMI. To delete an AMI, in the Console go to Images – AMIs, elect the AMI and choose Actions – Deregister.
For more details on creating and using AMIs see the Amazon web site.
Costs And Billing
To view current incurred costs, log in as the Root user. To view accumulated spending, click on the username at the top of the console page and select My Billing Dashboard.
| VM Type | RAM (Gb) |
Threads | FLAC3D Speed (kzone/s) |
3DEC speed* | Price/hour | Price/day |
|---|---|---|---|---|---|---|
| r4.2xlarge | 61 | 8 | 1000 | $0.900 | $21.60 | |
| r4.4xlarge | 122 | 16 | 2900 | $1.800 | $43.20 | |
| r4.8xlarge | 244 | 32 | 4200 | $3.600 | $86.40 | |
| c4.large | 3.75 | 2 | 500 | $0.192 | $4.61 | |
| c4.2xlarge | 15 | 8 | 1000 | $0.770 | $18.48 | |
| c4.4xlarge | 30 | 16 | 2950 | $1.530 | $36.77 | |
| c4.8xlarge | 60 | 36 | 3850 | $3.091 | $74.18 | |
| c5.large | 4 | 2 | 600 | 600 | $0.177 | $ 4.25 |
| c5.xlarge | 8 | 4 | 1100 | 775 | $0.354 | $ 8.51 |
| c5.2xlarge | 16 | 8 | 2000 | 1000 | $0.710 | $ 17.04 |
| c5.4xlarge | 32 | 16 | 3750 | 1100 | $1.416 | $ 33.98 |
| c5.9xlarge | 72 | 36 | 5900 | $3.186 | $ 76.47 | |
| c5.12xlarge | 96 | 48 | ?? | $4.248 | $ 101.95 | |
| c5.18xlarge | 144 | 72 | ?? | $6.372 | $ 152.93 | |
| z1d.xlarge | 32 | 4 | 1150 | 800 | $0.556 | $ 13.34 |
| z1d.2xlarge | 64 | 8 | 2380 | 1020 | $1.112 | $ 26.69 |
| z1d.3xlarge | 96 | 12 | ? | 1030 | $1.668 | $ 40.03 |
| z1d.6xlarge | 192 | 24 | ? | $3.336 | $ 80.06 | |
| z1d.12xlarge | 384 | 48 | ? | $6.672 | $ 160.13 |
*3DEC speed depends on number of zones, contacts, and subcontacts. Numbers listed are for a specific test.
Costs reported above correct as of September 30, 2020. Visit the Amazon web site to get current pricing information.
Note that new AWS accounts may start with CPU limits. See the current limits by going to the EC2 console, selecting Limits from the left panel, and then clicking Calculate CPU Limits. One can also request a limit increase from the calculator.
| Was this helpful? ... | 3DEC © 2019, Itasca | Updated: Feb 25, 2024 |