Creating Blocks, Splitting, and Deleting
Blocks are closed polygons. They are meshed using the “Mesh Block” tool (![]() ) or “Mesh All Blocks” tool (
) or “Mesh All Blocks” tool ( ). Closed, simply-connected polygons with 3- or 4-sides may be meshed using structured or unstructured mesh; all other polygons are meshed with unstructured mesh only. Examples of various blocks with structured, unstructured, and mixed meshes are shown in the image below.
Figure 1: Clicking or marquee selecting closed polygons with the “Mesh Block” tool causes them to be meshed. Blocks that will have structured meshes are highlighted blue; pink indicates a block will have unstructured meshing.
Create a Single Block
![]() Using the “Mesh Block” Tool
Using the “Mesh Block” Tool
Select the “Mesh Block” tool from the toolbar.
Move the cursor inside a block.
When the block is highlighted (blue indicates the meshed block will contain a structured mesh, pink indicates an unstructured mesh), click to mesh.
Using Coordinates
With the “Mesh Block” tool active, press spacebar and enter coordinates. If the coordinates supplied lie within a closed polygon, a meshed block is created.
Create Multiple Blocks
![]() *Using the “Mesh Block” Tool
*Using the “Mesh Block” Tool
Select the “Mesh Block” tool from the toolbar.
Click-and-drag a rectangle around the blocks to be meshed.
Release the left mouse button to finish creating meshed blocks.
Using the Auto-blocking Tool
Press the auto-blocking tool button on the toolbar. All closed polygons in the sketch are meshed with structured or unstructured meshing, depending on the shape of the block and the zoning specifications along the block’s edges.
Structured Mesh Operations
Splitting
![]() Using the “Mesh Block” Tool
Using the “Mesh Block” Tool
Position the tool within a structured-mesh block. Cyan crosshairs at the mouse position indicate the prospective split. If the mouse is positioned at an edge, the split operation will split that edge.
Click to execute the split. Splitting propagates in both directions across the model through all attached blocks with structured mesh.
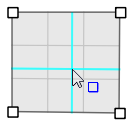
Figure 2: Clicking with the blocking tool within a previously defined block will split the block as indicated by the cyan crosshairs.
Using Coordinates
With the “Mesh Block” tool active, press spacebar. The current mouse position’s coordinates are displayed. Provide the desired coordinates for the split and press Enter to complete the split.
Zone Multiplier
Zoning in a structured-mesh block may be increased by using the “Zone Mult.” property. When this property is set, the number of zones specified along the edges of a block will be multiplied by the value provided (which must be an integer).
Unstructured Mesh Operations
Re-Blocking
Any operation that changes the geometry of an unstrurctured-mesh block (e.g., moving nodes, changing edge zoning, splitting an edge, etc.) causes removal of the block’s unstructured mesh. Re-meshing the block (using any of the methods described above) is necessary to account for the new geometry.
Delete
 Using the Select Tool
Optionally, press Ctrl and select additional blocks to add to the selection.
Press Delete to delete the selected blocks.
Using the Right Mouse Button
When the “Mesh Block” tool (![]() ) is active, the regular selection functions of the select tool () are available from the blocking tool’s right mouse button, as described in Right-Click Selection Overload.
) is active, the regular selection functions of the select tool () are available from the blocking tool’s right mouse button, as described in Right-Click Selection Overload.
Automatic Meshing & Meshing Defaults
The “Mesh Tools” menubutton provides two options: “Auto-size…” and “Set Meshing Parameters…”. Use of both is described separately in the document Meshing.
| Was this helpful? ... | Itasca Software © 2024, Itasca | Updated: Apr 02, 2024 |
