
Creating Blocks, Splitting and Deleting
Blocks can be created from polygons with the use of the blocking tool ( ). The polygons must be closed, 3- or 4-sided convex shapes. It’s necessary to create blocks from these polygons before these areas can be zoned.
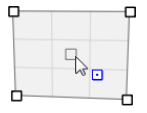
Figure 1: Clicking on a closed convex quadrilateral with the blocking tool causes it to be blocked
To Create a Block
Position the blocking tool within an area enclosed by a three- or four-sided shape, and click. The area will be shaded upon successful block creation. Note that all blocks also have a default zoning (indicated by the internal cross-hatching in the adjacent figure) to further indicate the “blocked” state of the area.
Creating Multiple Blocks
Position the blocking tool outside the area of interest and click-and-drag a selection rectangle around the prospective blocks. On release of the left mouse button, all closed polygons that can be blocked will be.
Creating a Block With Coordinates
With the blocking tool active, press [spacebar] and enter coordinates. If the coordinates supplied lie within a closed shape, a block will be created.
Splitting a Block
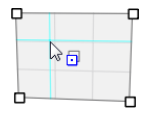
Figure 2: Clicking with the blocking tool within a previously defined block will split the block as indicated by the cyan crosshairs
With the blocking tool active, positioning the tool within a shaded (blocked) shape will show cyan crosshairs that intersect at the mouse point. These indicators shift as the mouse is moved around the interior area of the block. When you are satisfied with the position of the split, click the mouse to split the block into the sections indicated. Note that such a split will, in both directions, propagate across the model as necessary to maintain a valid geometry.
Splitting a Block Using Coordinates
With the blocking tool active, position the tool within a shaded (blocked) shape. Cyan crosshair indicators will indicate where a split would occur if the left mouse button were clicked (as described above). If, instead, you press Ctrl + [spacebar], a pop-up property editor will appear with the current coordinates of the mouse pointer entered into the edit field. Enter the desired coordinates for the split and press [Enter] to create the split. If this operation is performed on an edge, it will split the edge of the block. In all cases, the split operation will propagate as needed and possibly cross the extent of the model to maintain a valid geometry. If this cannot be done, the block that received the split operation will be “unblocked”.
Deleting One or More Blocks
With the blocking tool () active, right-click on the block handle (the square in the middle of the block) to select the block, then press Delete. This will “unblock” the polygon. This can also be done by picking the selection tool, left-clicking on the target block, and pressing Delete. To delete multiple blocks, hold Control while right- or left-clicking (per above) on a set of block handles to create a multiple-block selection, then press Delete.
Using the Right Mouse Button
While the blocking tool is active, selection functions of the left mouse button transfer to the right button.
You can select a block by right-clicking the block handle (the square in the middle of the block). Holding the Control key down while you right-click will let you add and remove blocks from a multiple selection. You can also use a selection rectangle to select a range of blocks, making sure you click one block first to specify the type of object to include in the selection.
The right mouse button also lets you drag selected objects to new positions.
Right-clicking with the blocking tool lets you select points or edges and then drag them to new positions.
| Was this helpful? ... | PFC 6.0 © 2019, Itasca | Updated: Nov 19, 2021 |