
Zoning
Block zoning may be done automatically or manually. Automatic zoning is applied to all blocks in the current view or to all blocks in both views, depending on the option selected in the dialog shown below. Manual zoning is applied to model edges, individually or in groups.
Automatic zoning
Automatic zoning can be used to create zoning across the model (or the particular view, depending which type of zoning is chosen) all at once. It is used by clicking the Autozone tool ( ) on the toolbar. This calls a dialog as seen here.
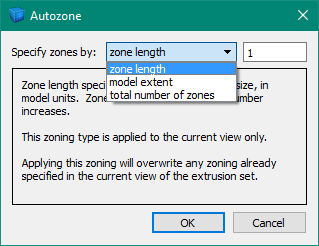
Figure 1: The autozoning dialog
Applying autozoning is simply a matter of choosing one of the three types presented in the dialog and then specifying a value to be used with that type. The three types operate as follows.
Zone Length
- Specifies the desired zone edge size, in model units. Zone size will increase as this number increases. This zoning type is applied to the current view only. Applying this zoning will overwrite any zoning already specified in the current view of the extrusion set.
Model Extent
- Specifies the number of zones to apply across the extent of the model (this is the larger of the two dimensions when used in the construction view). Zone size will decrease as this number increases. This zoning is applied to the current view only. Applying this zoning will overwrite any zoning already specified in the current view of the extrusion set.
Total Number of Zones
- This is only available when the extrusion set has a nonzero depth. It specifies the total number of zones in the model. Zone size will increase as this value decreases. This zoning is applied to both the extrusion view and the construction view at the same time, regardless of which is the active (visible) view. Applying this zoning will overwrite any existing zoning already specified in the extrusion set.
It is important to remember that the first two autozoning types are applied only to the active view of the extrusion. They will not be applied to the inactive (unseen) view. Because the third type, “total zones,” attempts to zone the model with an overall number of zones, it necessarily applies to both views of the extrusion.
Using the autozoning tool will override any previous zoning — manual or automatic — that has previously been applied to an edge. It will not override zone multipliers applied to blocks or zone ratios applied to edges (See Additional Zoning Controls below).
Manual Zoning
Select one or more edges to apply zoning to. Access the “Zones” property through either the Control Panel or the Popup Property Editor and provide a value. The number of zones specified will be created along that edge and will propagate as necessary across adjacent blocks.
Additional Zoning Controls
In the construction view, blocks have a zone multiplier property and edges have a ratio property that may be used to further refine the existing zoning. In the extrusion view, edges have a ratio property. See the topics Object Properties in the construction view and Object Properties in the extrusion view for information on how to access these properties.
Note neither of these properties will override other zoning properties that have been supplied previously via automatic or manual zoning.
| Was this helpful? ... | PFC 6.0 © 2019, Itasca | Updated: Nov 19, 2021 |