Selection and Manipulation of Objects
The selection tool in the toolbar can be used to select objects and move them.
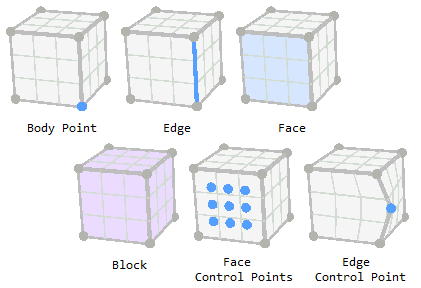
The following objects can be selected. A distinction is made between a “body point” (a point at the end of an edge) vs a “control point” (a point that shapes a face or an edge).

Click an object to select it. Control+click to add or remove objects from a multiple selection.
Selecting a block takes more than a simple click. You can select one or more faces and then press ‘B’ to convert the face selection to a block selection. Or right click a face (selected or not) and choose a command from the context menu: either “Select Block” or “Select Blocks From Faces”.
When you right-click a block that has a group assigned, the context menu will hold a command called “Select Blocks in Group: <name>” where <name> is replaced with the actual group name. This command will first show all the blocks that have that group assigned, and then will select all those blocks.
When you select an object, it becomes a “seed” selection, meaning that when you add more objects to a multiple selection, only objects of that same seed type can be added. So you can select multiple points, for example, but not points and edges at the same time.
The command can be used to select all the objects of the current seed type. For control points, this means that when one or more control points are already selected, all the rest of the control points on the same edge or face will become selected.
Selection mode is the default mode for the mouse to be in. Pressing the ESC key while in the middle of an operation should cancel the operation and put the mouse back into this mode.
The Selection Rectangle
A selection rectangle can be drawn to add multiple objects to a selection. (Press the mouse button, drag, then release.) When making a multiple selection of points, for example, you would typically click one point first to select it and make it the seed selection. Then you would draw a selection rectangle to select more objects of the same type.
Using the Control key with a selection rectangle will invert the selection state of objects within the rectangle.
Using the Shift key, the selection rectangle will only add objects to the current selection.
To make a selection rectangle using the Shift key, the rectangle must start in unused white space. But with the Control key, the rectangle can start in white space or on one of the unselected faces of a block.
A selection rectangle can be used for any of the object types listed above except control points.
Surface vs Deep, and Parallel vs Perspective Modes
The status bar holds 2 buttons that affect how the selection rectangle works.

The Surf/Deep button switches between surface selection and deep selection. With surface selection, the selection rectangle selects only objects that are visible in the display — an object must have at least one pixel visible within the selection rectangle for it to be selected. Deep selection makes the selection rectangle behave as though it were projected deep into the model, and the objects within that projection are selected whether they are visible on screen or not.
The Persp/Parallel button changes how the model is rendered to the screen, switching between parallel and perspective projection. This affects which objects are selected by a selection rectangle but only when deep selection is in effect.
These two settings are also available in the control sets. The Surface/Deep setting is in the View control set and the perpective/parallel setting is in the View Stats control set.
Most often these buttons are set to either Deep and Parallel or Surface and Perspective.
Manipulating Objects
When you press the mouse button on an unselected point, edge, or control point, and drag the object, you are performing a free translation, meaning that you’re dragging the object in a plane parallel to the screen. Releasing the mouse button completes the drag. Pressing the right mouse button while the left button is still down will cancel the drag.
When you select an object, a set of axes appears. The axes and related controls are collectively known as the handle. You can drag the center point of the handle to do the same kind of free translation as is done on an unselected object.
Free translation can also be done by dragging a selected object.
The component parts of the handle include rotation arcs, scale controls, and in-plane translation controls.

The scale, rotation and in-plane translation controls can be shown or hidden using the context menu on the center point of the handle.
The center point is also known as the reference point and is the same reference point seen in the Object Properties control set. In the control set, you can enter coordinates to change the position of the handle, which will have the effect of moving the entire selection. The “Offset” fields under “Ref. Point” let you move the selection along one or more axes.
You can drag an axis to move the current selection in the direction of the axis.
Just clicking an axis will make an edit field appear where you can enter a new position or offset along the axis.
While the Building Blocks pane has input focus and the handle is visible, the Tab key will move the input focus to the “Ref. Point” edit fields in the Object Properties control set (assuming the Object Properties control set is open). There you can enter new coordinates.
The center point of the handle is the point around which objects are rotated or scaled. You can click a rotation or scale control to show an edit field where an exact value can be entered, or you can drag the control using the mouse.
The scale control normally works along one axis, but you can do 3D scaling if you press the mouse button on the scale control and then hold the Shift key down while dragging. 3D scaling can also be done by clicking the scale control to get the edit field and then holding down the Shift key when you press Enter.
To relocate the handle without moving selected objects, you can Alt+drag the center point or use the context menu on the center point and choose the “Relocate Handle To…” command. The “Reset Location” command will move the handle back to its default position.
There is a technique called 1D snapping where you make a selection, start dragging an axis to move the selection along just one axis, and then hold down the Shift key. The Shift key will highlight a snap location when the mouse is over it. If you move the mouse to the snap location and release it, the handle will be moved along the axis to a location corresponding to the highlighted object, and the current selection will be moved by the same amount. Snap locations include body points, points in a geometric data set, and points projected onto polygons in a geometric data set.
In the Object Properties control set, the “Resize” line uses the current location of the handle. Selected objects will be resized using the specified values for each axis, relative to the handle position.
- When doing rotation, the axis of rotation can be specified using an existing edge:
- select the edge with the correct rotation axis;
- in the Object Properties control set, on the Rotate line, click the button to copy the axis from the selected edge;
- select the objects to be rotated;
- use the Alt key to reposition the handle to be at the center of rotation;
- in the control set, enter the angle of rotation.
Reflection (turning a selection of blocks into its mirror image) can be accomplished using controls in the Object Properties control set. The typical workflow is to copy some blocks, paste them into an open area, leaving them selected, and then click a button for the X, Y or Z axis to reflect the blocks along that axis. The X, Y and Z controls will be enabled only if the selected blocks are not attached to other blocks.
Moving a body point vs an edge control point
When you move a body point, the selection tool works a little differently than the control point tool. Using the selection tool, when you move a body point, the edge control points move with the attached edges. When the control point tool moves a body point, the edge control points stay in place, but only if you move only one of the two end points of an edge.

Point-to-Point Movement
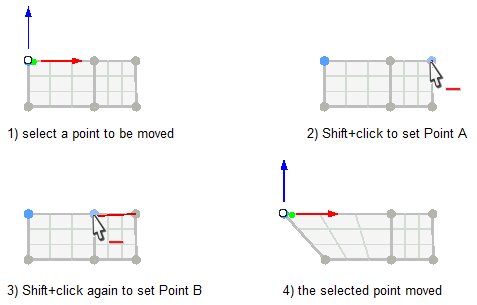
- Both the selection tool and control point tool allow point-to-point movement:
- select one or more objects,
- Shift+click any point to mark it as Point A,
- Shift+click any other point to make it Point B.
- The selection will be moved the direction and distance indicated by a Point A to Point B move.

(Do not drag the mouse. Shift+click point A and release the mouse button, then Shift+click point B.)
A different mouse pointer (  ) is present while Point A is set. It is present even while the Shift key is not down, to remind you that you have a Point A specified.
Movement Along Arbitrary Axes
While there are no tools devoted to translation along an arbitrary axis, a workaround is available. You can use the context menu to create a free block of whatever size you choose, then rotate the block in any direction, which gives you edges oriented in whatever direction you choose. Then select the objects you want to translate and use point-to-point movement to move the selection along the axis defined by an edge.
Merging Points
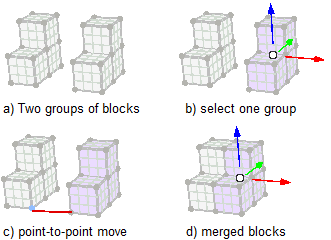
You can merge two points by dragging one unselected point to another, or by using point-to-point movement to move a single selected point to another point. If the merge is successful, the edges for the combined points will briefly highlight in cyan (light blue).
Point-to-point movement can be used to merge multiple points in one operation. If you have two groups of blocks that you know should fit together, you can select one group and merge the blocks by merging two matching points:

When using this technique to merge multiple points, the program automatically uses the “View Tolerance” setting shown in the status bar.
Copy and Paste
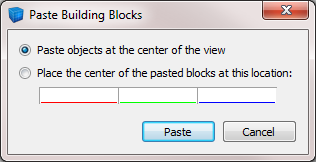
Blocks can be copied and pasted within a set or from one set to another. When you select one or more blocks, the command will become enabled and you can copy the blocks (provided you have saved your project first). When you choose the command, you will see a dialog asking where to paste the blocks.

You may paste the blocks in the center of the view or you can specify x, y and z coordinates for the center of the collection of blocks.
When the copy and paste commands are used together with the ability to import and export sets of blocks, you can save sets of your favorite shapes, load a set and then copy and paste the shapes to your new sets.
| Was this helpful? ... | 3DEC © 2019, Itasca | Updated: Feb 25, 2024 |
