Face Control Points
Face control points let you shape a face to a greater degree than edge control points alone.
Control points can be added to faces using Selection mode ( ) or Control Point mode (
 ). As of this writing, the control points can be added to 4-sided faces but not to triangles.
In Selection mode, you can select one or more faces and then locate the “Face Ctrl Pts” line in the Object Properties control set. Enter a number for the dimensions of a matrix of control points (n x n). A value of 2 or more is allowed, up to the maximum, but 1 is not allowed. A value of 0 will delete the control points on the selected faces. The control points can be seen while in Control Point mode.
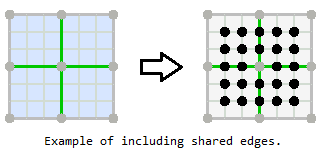
The checkbox labeled “Include shared edges”, when checked, will take the dimension of the face control point matrix and apply it to edges that have more than one face selected. In the example shown here, with 4 faces selected, the edges shown in green will each get 2 control points because the size of the face control point matrix gets set to 2 x 2.


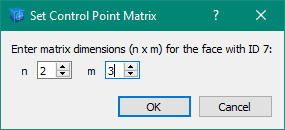
In Control Point mode, face control points are set for one face at a time by way of the context menu. You can right-click a translucent face or a face control point to get access to the menu item “Set Control Point Matrix…”. This command will show a dialog where you can enter new matrix dimensions for the face.


Selection and Manipulation
Face control points can be individually selected by clicking them. A Control+click can be used to create multiple selections. Marquee selection does not work on control points. When at least one control point is selected, pressing Control+A will select all the remaining control points on the same face. When all the control points are selected, pressing the Delete key will delete them. Multiple control points can be selected for only one face at a time.
Handle operations work the same way for face control points as for other objects except that scaling is not supported.
Point-to-Point Snapping
Point-to-point snapping works with face control points the same as with edge control points. Select a face control point to move by Shift+clicking it, then Shift+click a location on geometric data, and the face control point moves to that location. More information on point-to-point snapping can be found here.
Draping
When you use the drape controls in the Object Properties control set, the commands sent to the Console always specify body points. So if you select an edge and drape it, the end points of the edge get specified in the command, and when both end points are specified, the control points on the edge get draped as well.
The same holds for faces. If you select a face and drape it, all the body points that are part of the face will get specified in the command, and when that happens, the face control points get draped as well.
| Was this helpful? ... | Itasca Software © 2024, Itasca | Updated: Aug 13, 2024 |
