
The source code for this example is python_pfc.py
Using Python with PFC
This section gives an example of interacting with PFC through a Python program.
First we import the itasca module with the import statement.
We use the shorthand it for the itasca Python module. The
itasca module defines the interaction between Python and PFC
import itasca as it
We always start Python programs with the following line.
Giving the command python-reset-state false changes this
behavior so the Python state is not cleared by the model
new or model restore commands.
it.command("python-reset-state false")
We are going to create some particles to show features of the
Python scripting. The it.command function is used to issue a
PFC command. This command will create a cubic packing of 8,000
spherical particles. The triple quotes are used to define a multi-line
string.
it.command("""
model
new
model domain extent -5e-2 6e-2 -6e-2 5e-2 -5e-2 5e-2
model cmat default model linear property kn 1e1 dp_nratio 0.2
ball generate cubic box -0.02375 0.02375 rad 1.25e-3
ball attr dens 2600
""")
We can confirm that 8000 balls were created by using the
it.ball.count function. Typing this value into the IPython
terminal prints the number 8000 to the screen.
it.ball.count()
- output:
8000
The itasca module defines functions and classes for interacting
with the PFC model. Some of these functions return objects,
ball = it.ball.find(1)
print(ball)
- output:
<itasca.ball.Ball object at 0x0000019444C7A6C0, ID : 1>
Here it.ball.find(1) return a ball object for the ball with id
1. Most PFC model items are objects (instances of a class) like
this. The ball object has many methods, for example
ball.radius()
- output:
0.00125
Above the variable ball is a Ball object. radius is a ball
method which returns the ball radius.
The for statement is used to iterate over things,
radius_sum = 0.0
for b in it.ball.list():
  radius_sum += b.radius()
In this example the for statement is used to loop over all the PFC
balls. During each loop the variable b is a different Ball object.
Finally, we check that the sum of the ball radii is what we expect.
print(radius_sum)
print(ball.radius() * it.ball.count())
- output:
10.000000000000503
10.0
There are two places where we interact with PFC balls: (i) the
functions that are part of the it.ball module and (ii) the
methods of an individual ball object. In Python terminology,
it.ball is a submodule of the itasca module. Above,
it.ball.count, it.ball.list and it.ball.find
are functions defined in the it.ball module and b.radius
is a method defined as part of the Ball class.
- A complete list of the
it.ballmodule functions is given here <link to it.ball.rst>. - A complete list of the Ball object methods is given here <link to it.ball.Ball.rst>.
PFC contacts are linked to Python in the same way as ball. To show this we cycle PFC for one step so contacts are created.
it.command("model cycle 1")
Let’s find the ball nearest the origin,
b = it.ball.near((0,0,0))
and confirm its position with the pos method.
b.pos()
- output:
vec3(( 1.250000e-03, 1.250000e-03, 1.250000e-03 ))
Note
The pos method returns a length three vector represented as a
vec3 object. See <link to vec.rst> for more information about
vec3 objects and working with vectors in Python.
We can see how many contacts this ball has with the contacts method.
len(b.contacts())
- output:
6
The built-in function len is used in Python to determine the
length of a sequence. The following code loops over all the contacts
that the ball b has and prints the contact id and contact position
for c in b.contacts():
    print("contact with id: {} at {}".format(c.id(), c.pos()))
- output:
contact with id: 11063 at vec3(( 1.250000e-03, 1.250000e-03, -1.951564e-18 ))
contact with id: 12163 at vec3(( 1.250000e-03, -1.951564e-18, 1.250000e-03 ))
contact with id: 12218 at vec3(( -1.951564e-18, 1.250000e-03, 1.250000e-03 ))
contact with id: 12221 at vec3(( 2.500000e-03, 1.250000e-03, 1.250000e-03 ))
contact with id: 12222 at vec3(( 1.250000e-03, 2.500000e-03, 1.250000e-03 ))
contact with id: 12223 at vec3(( 1.250000e-03, 1.250000e-03, 2.500000e-03 ))
Note
The string object format method is used to substitute values
into a string. The {} parts of the string are replaced by the
arguments to the format method. In this case to show the contact id and position.
Next we investigate a contact object
c = b.contacts()[0]
The [ ] brackets are used to get an item from the tuple returned by the
contacts method. In Python indices start a 0. We can see the
contact force (in the global frame):
c.force_global()
- output:
vec3(( 0.000000e+00, 0.000000e+00, 0.000000e+00 ))
Or look at the properties defined on this contact with
c.props()
- output:
{'kn': 10.0, 'ks': 0.0, 'fric': 0.0, 'lin_force': vec3(( 0.000000e+00, 0.000000e+00, 0.000000e+00 )), 'lin_slip': False, 'lin_mode': 0, 'rgap': 0.0, 'emod': 5092.958178940651, 'kratio': 0.0, 'dp_nratio': 0.2, 'dp_sratio': 0.0, 'dp_mode': 0, 'dp_force': vec3(( 0.000000e+00, -0.000000e+00, -0.000000e+00 ))}
The props method returns a Python dictionary object. To access the individual parts of a dictionary the [] brackets are used with a string key,
c.props()['fric']
- output:
0.0
or the prop method can be used.
c.prop('fric')
- output:
0.0
Contact (or ball) properties can be set with the set_prop method.
c.set_prop('fric', 0.5)
print(c.prop('fric'))
- output:
0.5
The bodies on either side of the contact can be accessed with the
end1 and end2 methods.
print(c.end1())
print(c.end2())
- output:
<itasca.ball.Ball object at 0x0000019444C7A510, ID : 3811>
<itasca.ball.Ball object at 0x0000019444C7A510, ID : 4211>
We can test which end of the contact corresponds to the Ball object b
print(c.end1() == b)
print(c.end2() == b)
- output:
False
True
In the following example a Python list comprehension is used to create
a list of all the balls contacting the ball represented by the object
b.
neighbor_list = [c.end1() if c.end2() == b else c.end2() for c in b.contacts()]

print("central ball id: {}, position: {}".format(b.id(), b.pos()))
print
for i, neighbor in enumerate(neighbor_list):
    print("neighbor ball {} id: {}, position: {}".format(i,
                                                         neighbor.id(),
                                                         neighbor.pos()))
- output:
central ball id: 4211, position: vec3(( 1.250000e-03, 1.250000e-03, 1.250000e-03 ))
neighbor ball 0 id: 3811, position: vec3(( 1.250000e-03, 1.250000e-03, -1.250000e-03 ))
neighbor ball 1 id: 4191, position: vec3(( 1.250000e-03, -1.250000e-03, 1.250000e-03 ))
neighbor ball 2 id: 4210, position: vec3(( -1.250000e-03, 1.250000e-03, 1.250000e-03 ))
neighbor ball 3 id: 4212, position: vec3(( 3.750000e-03, 1.250000e-03, 1.250000e-03 ))
neighbor ball 4 id: 4231, position: vec3(( 1.250000e-03, 3.750000e-03, 1.250000e-03 ))
neighbor ball 5 id: 4611, position: vec3(( 1.250000e-03, 1.250000e-03, 3.750000e-03 ))
As we expect this ball has 6 neighbors because of the cubic packing.
Python Type System
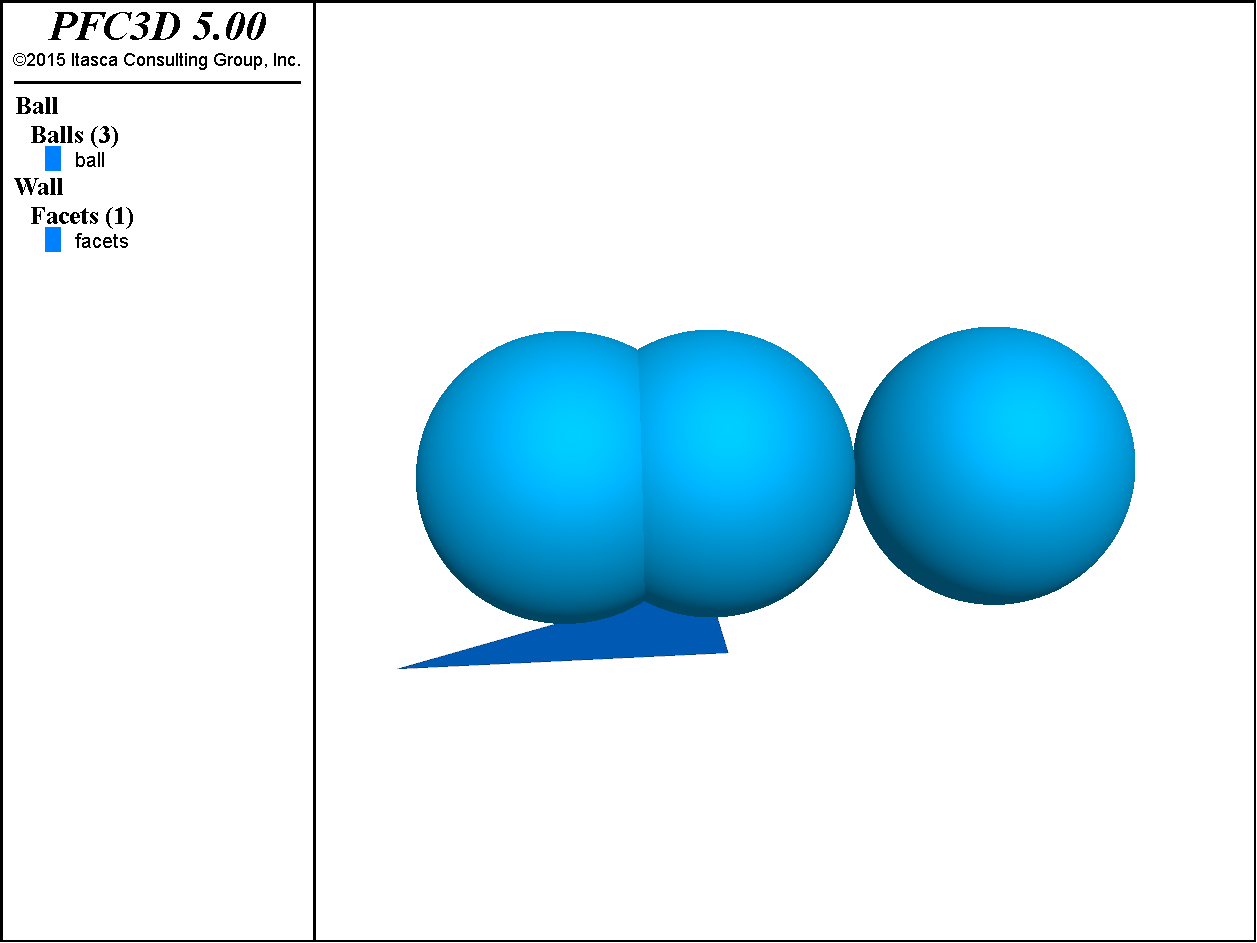
Next we create a new model with three balls and a wall to demonstrate the Python type system.
it.command("""
model new
model domain extent -1 1 -1 1 -1 1
model cmat default model linear property kn 1e1 dp_nratio 0.2
""")

from vec import vec

origin = vec((0.0, 0.0, 0.0))
rad = 0.1
eps = 0.001

b1 = it.ball.create(rad, origin)
b2 = it.ball.create(rad, origin + (rad-eps, 0, 0))
# create a third ball close enough to generate a virtual contact
b3 = it.ball.create(rad, origin + (rad*3 + eps, 0, 0))

it.command("""
ball attribute density 1200
wall create vertices  ...
   -{rad} -{rad} -{rad} ...
   {rad} -{rad} -{rad} ...
   {rad} {rad} -{rad}
model cycle 1
""".format(rad=rad))
Executing this code and plotting the balls and walls should look like the figure below.
There are three active contacts and one inactive contact in this model. By default the it.contact.list function only returns active contacts.
for c in it.contact.list():
    print(c)
- output:
<itasca.BallBallContact object at 0x0000019444C7A420, ID : 1>
<itasca.BallFacetContact object at 0x0000019444C7A4B0, ID : 1>
<itasca.BallFacetContact object at 0x0000019444C7A420, ID : 2>
The inactive contacts can be included in the list by adding the
all=True keyword argument.
for c in it.contact.list(all=True):
    print(c)
- output:
<itasca.BallBallContact object at 0x0000019444C7A4B0, ID : 1>
<itasca.BallBallContact object at 0x0000019444C7A420, ID : 2>
<itasca.BallFacetContact object at 0x0000019444C7A4B0, ID : 1>
<itasca.BallFacetContact object at 0x0000019444C7A420, ID : 2>
Different contact types have different Python types. Use with the
built-in type function to determine the type of an object.
c1, c2, c3, c4 = tuple(it.contact.list(all=True))

print(type(c1) is it.BallBallContact)
print(type(c1) is it.BallFacetContact)
print(type(c3) is it.BallFacetContact)
- output:
True
False
True
Here it.BallBallContact is a Python type object. If we
only want the Ball-Ball contacts we can pass this type object to the
it.contact.list function
for c in it.contact.list(type=it.BallBallContact, all=True):
    print(c)
- output:
<itasca.BallBallContact object at 0x0000019444C7A4E0, ID : 1>
<itasca.BallBallContact object at 0x0000019444C7A420, ID : 2>
Python Callback Functions
Python functions can be run at specific points during the PFC
calculation sequence. The it.set_callback function registers Python functions to be
called during cycling while the it.remove_callback removes these function callbacks.
i=0
def my_callback(*args):
    global i
    i += 1
    print("in Python callback function.")

it.set_callback("my_callback", -1)
it.command("model cycle 5")
print("The Python callback function was called {} times".format(i))

it.remove_callback("my_callback",-1)
i=0
it.command("model cycle 5")
print("The Python callback function was called {} times".format(i))
- output:
in Python callback function.
in Python callback function.
in Python callback function.
in Python callback function.
in Python callback function.
The Python callback function was called 5 times
The Python callback function was called 0 times
Note
Callback function registration is cleared when a new command
is given. Be careful not to register the same Python function to
be called more than once per cycle. Use the list fish callback
command to see which functions have already been registered.
| Was this helpful? ... | PFC 6.0 © 2019, Itasca | Updated: Nov 19, 2021 |