Splitting Blocks
The Split Blocks tool ( ) in the toolbar puts the mouse into a mode where you can split one block after another.
- To split from point to point, click the first point and then click the opposite point on the same face.
- You can split from a point to an opposing edge on the same face.
- A click in the middle of a face will split the face.
The cyan lines indicate what type of split will occur.
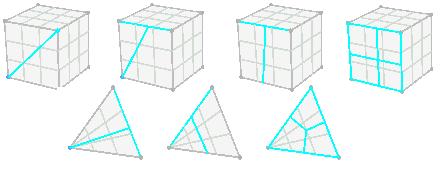

Figure 1: This type of split is not allowed on a wedge.
The Options dialog for Building Blocks includes a setting for whether snap targets show up. A snap target (small dot) will appear at the center of an edge or face when the mouse gets near it. When the snap target is colored cyan, clicking will move the location of the split to the location of the snap target.
The process of propagating a split to other blocks in the model can become complicated for the program. If the result of the split is not acceptable, remember that you can use the Edit>Undo command to undo the split.

Figure 2: This split would create a 5-sided face and is not allowed.
For a wedge-shaped block, the edge of a triangle can’t be split across a 4-sided face to a point on the opposite side.
Splitting a 4-sided face from one side to an adjacent side would create a 5-sided face, so that’s not allowed.
The Propagation Setting
The arrow at the right side of the Split Blocks tool button shows a menu with a propagation setting. When the program is propagating a split, it will either propagate through a triangular face or stop (arrest) at it, based on this setting.

Example:
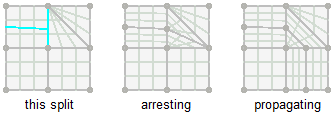
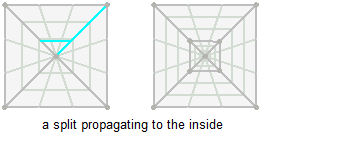
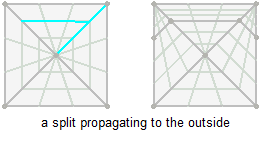
When splitting is set to propagate, the location of the split determines which direction propagation will occur in. Split an edge at one side or the other of its mid-point to make propagation continue in that direction.
Splitting a Curved Edge
An example follows, showing a curved edge, where the edge has only two zones to make the example more clear. You can see the divergence between the line drawing the curved edge and the lines drawing the zones.
To split the curved edge, just click it with the Split Blocks tool to start or end a split.

When the curved edge is buried inside the block, as in the next example, splitting is a little more difficult. Here the edge curves inward and is hidden by the zones. Although the curved edge is highlighted here, it’s inaccessible to the Split Blocks tool from this viewpoint.
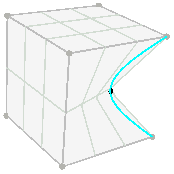
You could rotate the model and zoom to the inside of the block from the side farthest from the curved edge. That would give the Split Blocks tool access to the curved edge. This is the best way to split at a precise location on a curve.
Another option is to click one of the zone lines along the curved edge. While it may not highlight when the mouse approaches it, it will still serve as the starting or ending point of a split. The starting point of the split will appear as though it were located on a straight edge and the split may not map precisely to the intended location on the curve.

As a general practice, you may want to add and split blocks first, and then add control points. That would help avoid the need to split curved edges.
Failure to Split
If a block fails to split, it may be due to the tolerance setting. In such a case, you may see a warning in the Console pane such as: “… Warning ! Wrong splitting parameters (points) supplied, points must be on the splitting face. split 0 blocks, added new 0.”
The recommended solution for this is to take the View Tolerance value seen in the status bar and enter it into the Tolerance dialog available under the Add Blocks tool menu.
| Was this helpful? ... | 3DEC © 2019, Itasca | Updated: Feb 25, 2024 |
