Cutting Blocks
The block cut command is used to make additional cuts in the solids created with the block create command or block generate command, to define joints, faults, and holes or excavations. The BLOCK CUT command can be used to create single faults, joint sets or Discrete Fracture Networks. In addition, the cutting logic can be used to create different block geometries by cutting out imported geometric surfaces or tunnels. Each of these capabilities are described in the following subsections.
Joints and Joint Sets
The block cut joint-set command can be used to make single cuts or multiple parallel cuts. Statistical parameters may be used to vary orientation, spacing and persistence to match logged jointing data.
The BLOCK CUT JOINT-SET command is first demonstrated in this section for making single cuts. Some planning should be done to optimize the sequence in which joints are created. Joints that define the geometry of excavations are usually cut first (see Internal Boundary Shapes), followed by the minor joints or joint sets. Through-going faults are usually defined last.
The primary keywords for the BLOCK CUT JOINT-SET command are dip, dip-direction and origin. Unless other keywords are used, the BLOCK CUT JOINT-SET command will create a single plane cutting through the model in the orientation specified. The origin point may be any point on the plane. Figure 1 shows how the orientations for dip and dip direction relate to the coordinate axes in 3DEC. The dip range is from 0 to 90◦; the dip direction range is from 0 to 360º.
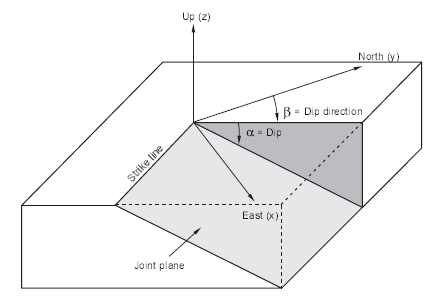
Figure 1: Terms describing the attitude of an inclined plane: dip angle, α, is positive measured downward from the horizontal (xy) plane; dip direction, β, is positive measured clockwise from north (y)
Control of the continuity of cuts made using the BLOCK CUT JOINT-SET command is accomplished with the block hide command or by using a range. The BLOCK CUT JOINT-SET command will only cut blocks that are currently visible.
The example below illustrates the creation of a noncontinuous joint.
Creation of a noncontinuous vertical joint
model new

; create a block
block create brick 0,1 0,1 0,1

; make a horizontal cut
block cut joint-set dip 0 dip-direction 0 origin 0,0,.5

; vertical cut through top block only
block cut joint-set dip 90 dip-direction 90 origin .5,0,0 ...
  range position-z 0.5 1
Figure 2 shows the full model and the joint structure plot for this example. Note that the vertical joint does not penetrate the bottom block. 3DEC automatically assigns a joint ID number = 2 to the horizontal joint and a joint ID number = 3 to the vertical joint. If desired, the joint ID number can be controlled with the jointset-id keyword. For example:
block cut dip 0 dip-direction 0 origin 0,.5,0 jointset-id = 1000
will create a horizontal joint with an ID number of 1000.
The ID numbers for joint faces and contacts are given sequentially as they are created. Therefore, if two faults that intersect are defined, the edge to edge contacts at the line of intersection will have the joint IDs of the second fault defined. This order becomes important if different properties are to be assigned to the different faults. Properties of the face-to-face contacts that make up most of the area of joints can be assigned using the block contact property command, in which the particular joint to be changed is identified using either its joint ID number or orientation. The difficulty comes in assigning property numbers to the edge-to-edge contacts that are created at joint and fault intersections. It is easy to assign property numbers to edge-to-edge contacts by use of the joint ID number; it is difficult to assign property numbers to edge-to-edge contacts by orientation, because they have a different orientation than either of the two intersecting planes that created them. There is a PLOT option that allows plotting of joint material properties. This plot is useful for checking that the edge-to-edge contacts are assigned the correct properties.
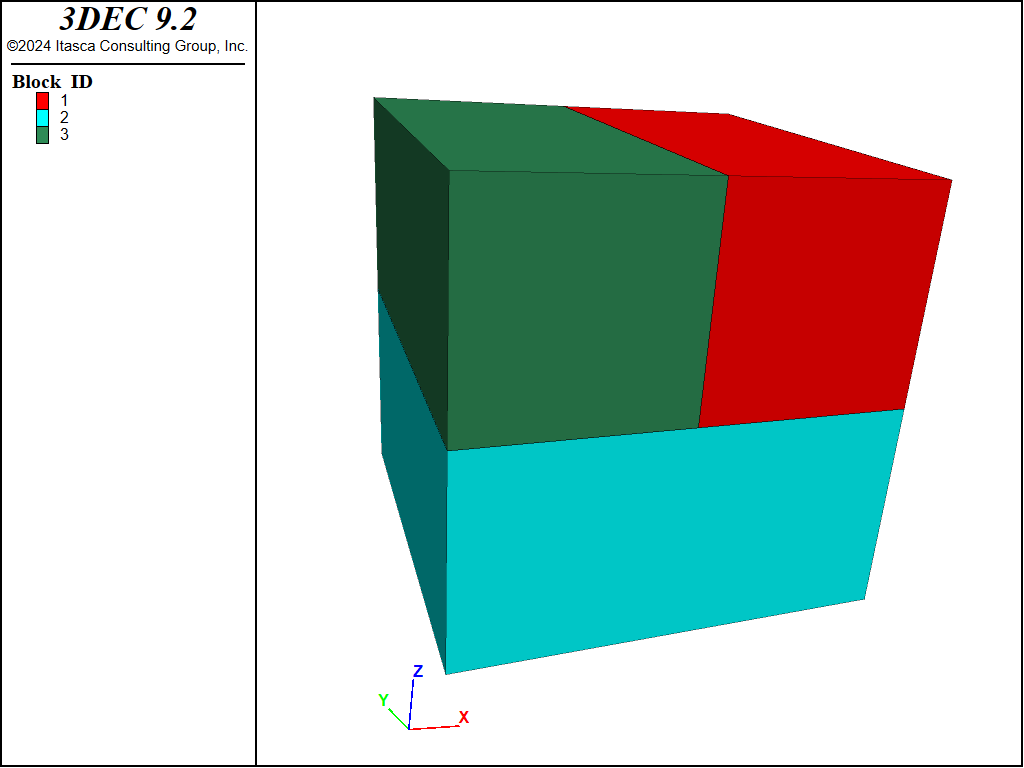
Figure 2: Model created with the BLOCK CUT and BLOCK HIDE commands: full-solid view
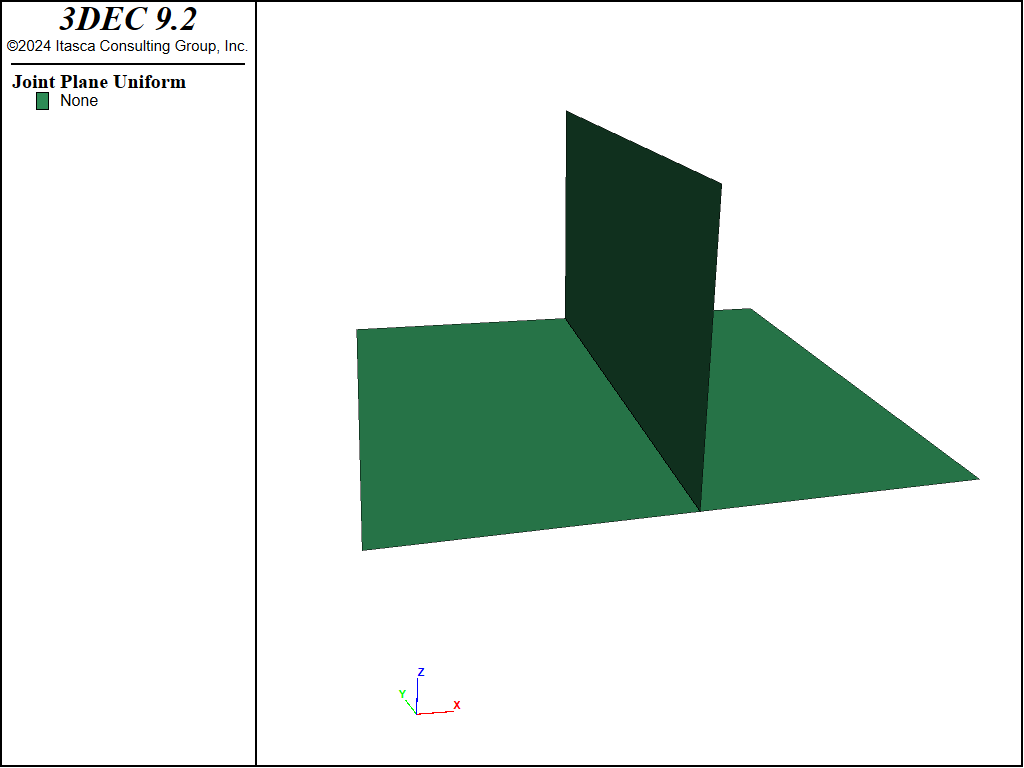
Figure 3: Model created with the BLOCK CUT and BLOCK HIDE commands: joint-structure view
Concave blocks can be made by using the block join command. The blocks that have been joined are still convex, but the join logic locks the interface between them. For example, add the following commands at the end of the previous example:
block hide range pos-x  0.5 1.0 pos-y 0 1 pos-z 0.5 1.0
block join on
Figure 4 shows the concave block that is created. Note that only visible blocks can be joined.
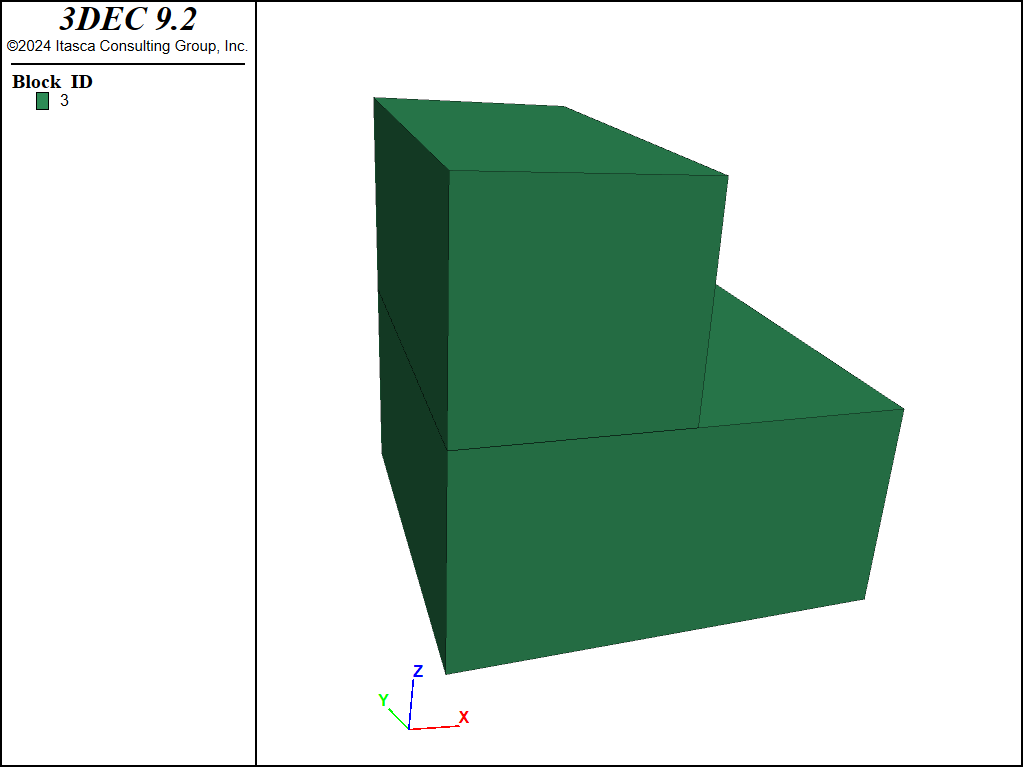
Figure 4: Concave block created with the BLOCK JOIN command
Joined blocks are plotted in the same color on the graphics screen. Also, contacts between joined blocks are identified as leader-follower (l-f) contacts. Type block contact list to check the contact type. Note that “follower” blocks will be automatically joined if they are connected to the same “leader” block. For example, if block A and block B are joined, and block A and block C are joined, then block B will be joined automatically to block C.
The BLOCK CUT JOINT-SET command can also be used to generate a set of joints automatically, based on physically measured parameters (i.e., joint dip, dip direction, spacing and persistence). By hiding selected blocks, a set of noncontinuous joints can be generated. In the example below, a jointed rock slope containing both shallow and deeply dipping joint sets is created. Two noncontinuous fractures are also created to define a rock wedge in the slope (see Figure 5).
model new
block create brick 0 80 -30 80 0 50

; shallow-dipping fracture planes (continuous)
block cut joint-set dip 2.45 dip-direction 235 origin 30 0 12.5
block cut joint-set dip 2.45 dip-direction 315 origin 35 0 30

; high angle foliation planes (continuous)
block cut joint-set dip 76 dip-direction 270 spacing 16 number 3 ...
  origin 30,0,12.5

; intersecting discontinuities (non-continuous)
block hide range position-x 0,80  position-y 0,50 position-z 0,10
block hide range position-x 55,80 position-y 0,50 position-z 0,50
block cut joint-set dip 70 dip-direction 200 origin 0 35 0
block cut joint-set dip 60 dip-direction 330 origin 50 15 50
block hide off
block hide range position-x 0,30 position-y -30,80 position-z 13,50
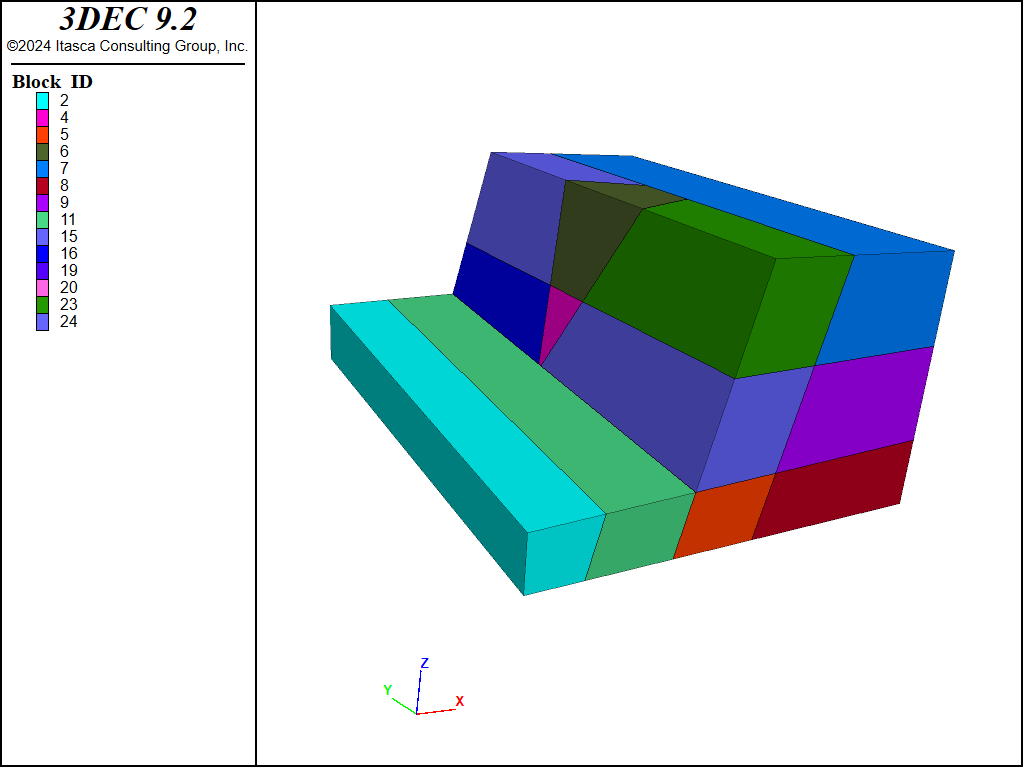
Figure 5: Rock slope containing continuous and noncontinuous joints
Bear in mind that joints are displayed as planar segments in the 3DEC model; many segments may be required to fit an irregular joint structure. The modeler must choose a level at which the 3DEC joint geometry will match the physical jointing pattern. The effect of geometric irregularity on the response of a joint can also be taken into account via the joint material model (e.g., by varying properties along the joint).
One final point concerning joint generation: When using continuum programs, it is usually appropriate to take advantage of symmetry conditions with excavation shapes, in order to reduce the size of the model. Symmetry conditions cannot be imposed as easily with discontinuum programs, because the presence of discontinuous features precludes symmetry except for special cases. For example, it is not possible to impose a vertical plane of symmetry through the model shown in Figure 5, because the joints in the model are not aligned with the vertical axis.
Join By Contact
By default, the cutting logic in 3DEC ensures that there are contiguous clumps of blocks. This is necessary for rigid block analyses where a single mass and moment of inertia for a joined group of blocks. It is also useful for visualiing which blocks are joined, since each contiguous clump can be plotted with a different color. A simple example is shown below.
model new
block create brick -10 10
block cut joint-set dip 90 dip-direction 90 join
block cut joint-set range position-x -10 0
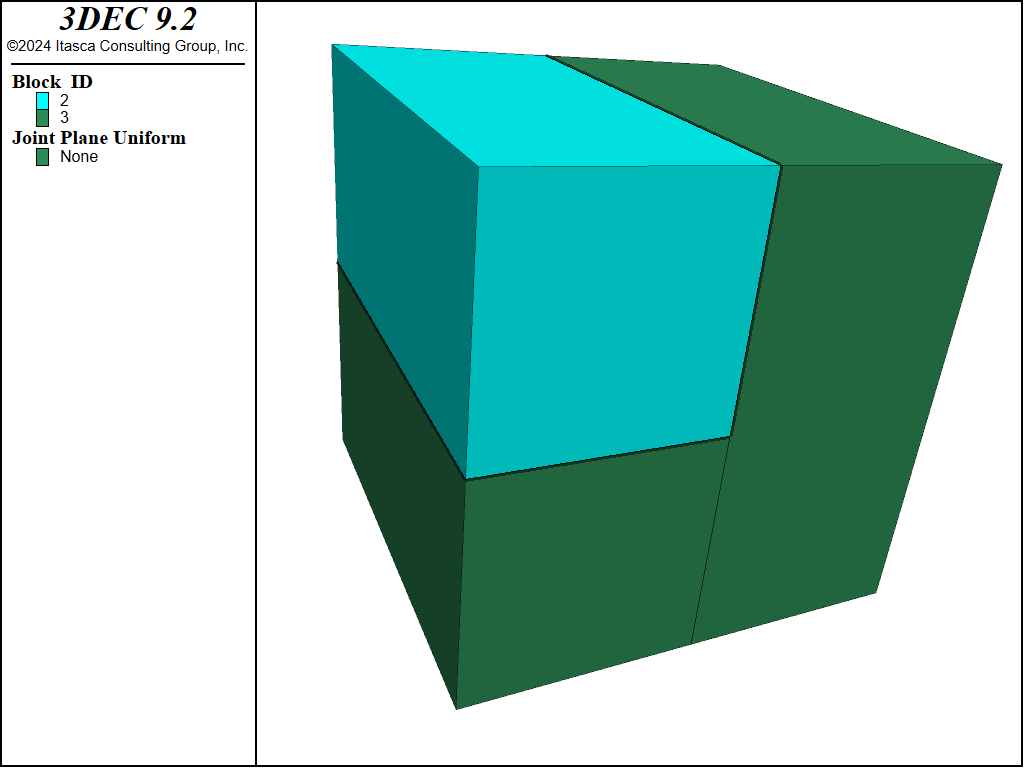
Figure 6: Cutting two joints with block join-by-contact set to off. Unjoined joints are shown as thick black lines. Joined joints are thin black lines.
When the second cut is made, half of the first cut becomes unjoined so that two separate clumps of joined blocks are created. If you are using deformable blocks, usually you do not want this to happen. The spontaneous unjoining of contacts increases the amount of calculation time and also requires you to set properties for these contacts that are not true joints (often they are just construction joints). By using the command block join-by-contact you can prevent these unjoining events. See the same example below. Note that in this case, a pair of blocks that have any contact joined will be plotted the same color.
model new
block create brick -10 10
block join-by-contact on
block cut joint-set dip 90 dip-direction 90 join
block cut joint-set range position-x -10 0
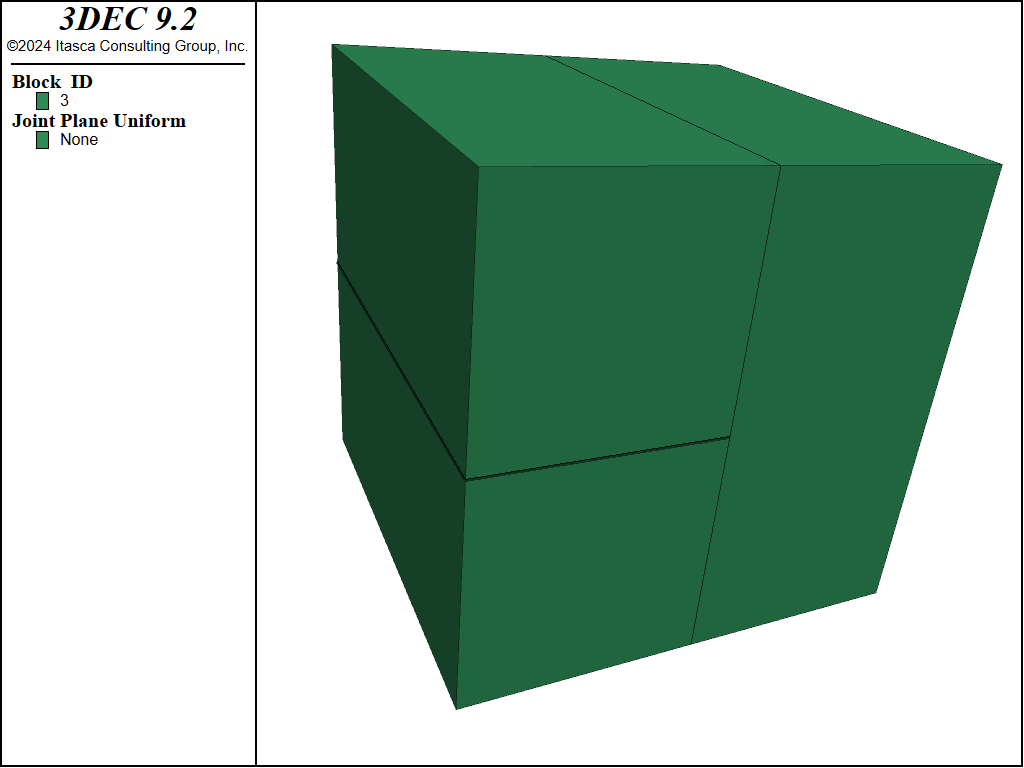
Figure 7: Cutting two joints with block join-by-contact set to on.
If you plot the block IDs, you will see the blocks colored by the ID of the leader block for a clump of joined blocks. If you wish to see each block as a different color, regardless of their joined status, choose \(Unjoined ID\) for the label in the block plot item.
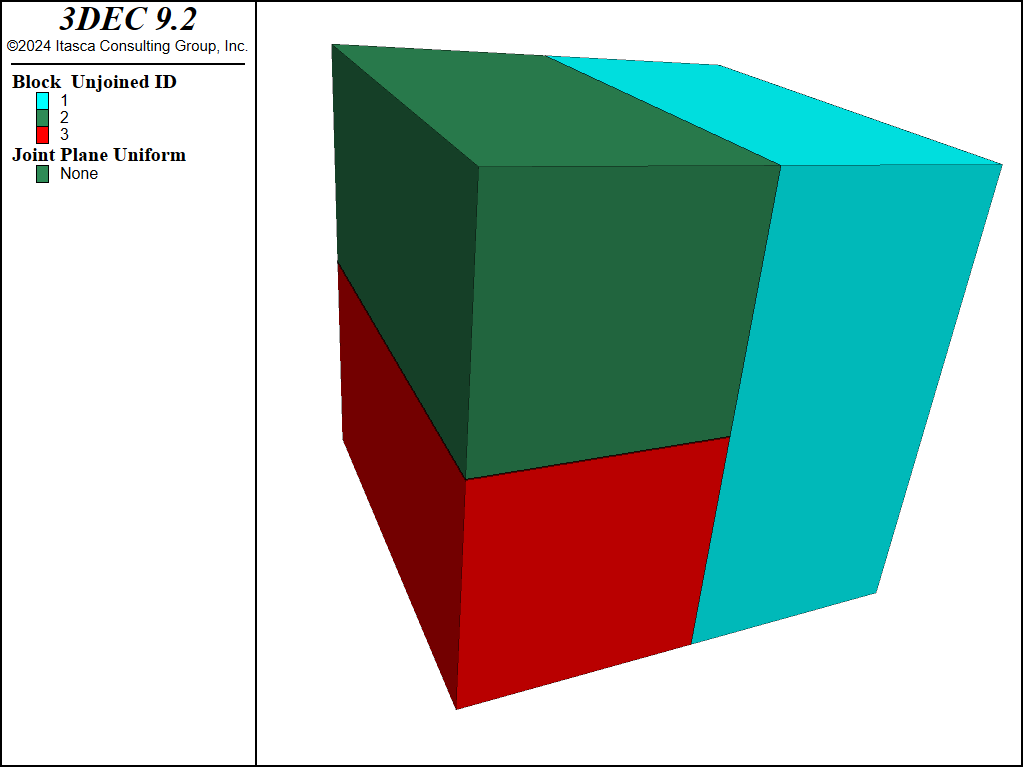
Figure 8: Cutting two joints with block join-by-contact set to on. The plot shows the true block IDs.
For a more realistic example of using block join-by-contact see the example Supported Tunnel.
Discrete Fracture Networks
Some statistical variation may be assigned to the joint spacing and orientation when creating joints with the block cut joint-set command. Much more sophisticated fracture assemblies may be simulated by first generating a Discrete Fracture Network (DFN) and then using this to cut the 3DEC blocks.
Faults modelled with the block cut joint-set command generally represent a deterministic fault, i.e. a fault or fracture that has been mapped and is represented explicitly in the model by specifying a location, dip and dip direction. The other alternative is a stochastic representation of faults. With this approach, specific faults are not modeled explicitly. Instead, a set of statistical parameters are defined and a joint set is generated based on the statistical input. In this way, the joints do not represent specific mapped joints, and the joint set is nonunique – different realizations will satisfy the statistical criteria.
A discrete fracture network (DFN) model is a statistical description of joints. A single DFN model can have multiple realizations. A DFN realization is a set of fractures whose characteristics obey the statistical description of the DFN model. A single realization can then be simulated with 3DEC. It is recommended that multiple 3DEC models be run with different realizations to test the full range of possible model responses to different random DFNs.
Commands, FISH and theory related to Discrete Fracture Networks, are descibed in the DFN section of this documentation.
A simple example of creating a DFN and using it to cut a 3DEC model is described below.
A more advanced example/tutorial can be found in the example Discrete Fracture Network (Advanced).
DFN Example
The example starts with creating the DFN. Before a DFN can be created, a model domain must be specified. For this example, we specify a DFN domain extending 50 units in both the positive and negative directions (100 unit lengths) with the command model domain extent -50 50. If only two numbers are provided, it is assumed that the domain is the same size in the x, y ansd z directions.
The easiest way to create a DFN in 3DEC is by first generating a template. The DFN template is a set of statistical parameters used to generate stochastic discrete fracture networks. These parameters include size distribution, the position distribution, and the orientation distribution. By default, the DFN template uses the following properties: uniform fracture positions, uniform orientations (dip between 0^{circ} and 180^{circ}, dip direction between 0^{circ} and 360^{circ}) and sizes obeying a negative power-law distribution with an exponent of 4. If no size limits are given, the fracture sizes will range from 1.0 to infty.
For this example, we will assign a template name, a power-law distribution with an exponent of 3 restricting the fracture size (disk diameter) to values between 1 and 100. We will also set the position and orientation to have uniform distribution. This is completed using the following commands:
fracture template create 'dfn_template' size power-law 3 size-limits 2 20 ...
  position uniform orientation uniform
Using the previously created DFN template, a set of fractures can be generated in the previously specified domain. The generation continues until a defined stopping criterion is met. In this example, a density (P32 value) of 0.1 is used as a stopping criterion. See DFN Overview for more information of DFN densities. The resulting DFN is shown in Figure 9
Finally, fractures that are sub-parallel and close together are merged into single larger fractures. This will help prevent the formation of very thin blocks in 3DEC when the DFN is used to cut joints in the block model.
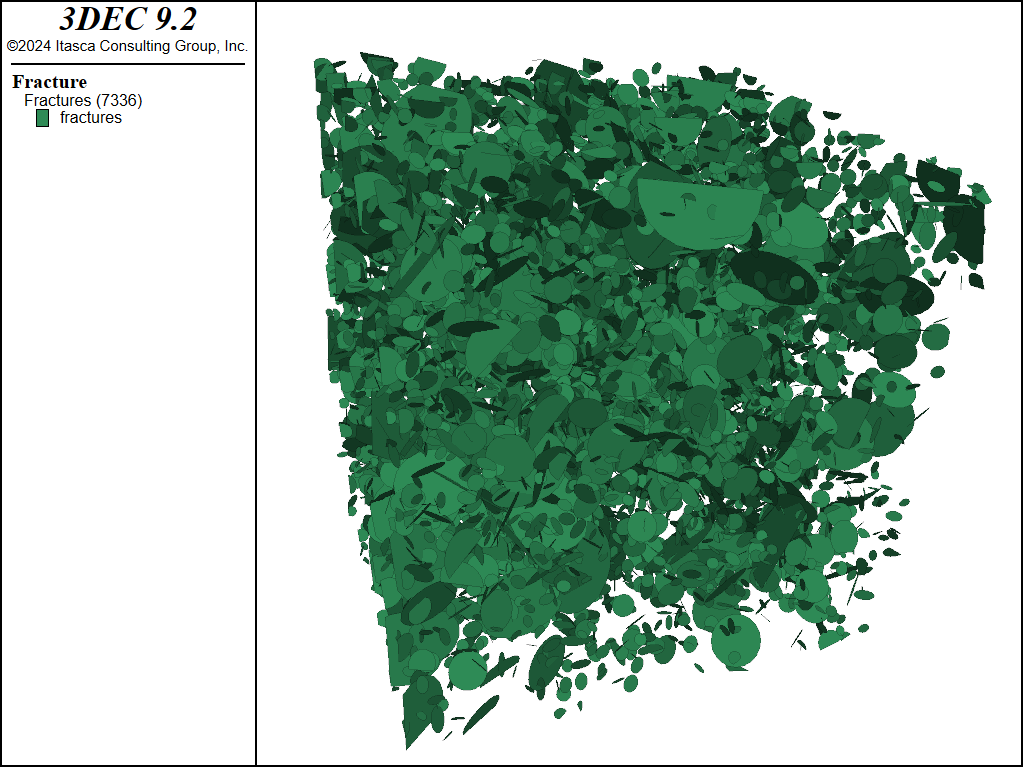
Figure 9: Generated DFN
Before creating a block model we must set the tolerance using the command 02. The tolerances affected include (1) the minimum distance between gridpoints, (2) minimum area (tolxtol) of sub-contacts, (3) tolerance to link gridpoints of joined blocks, and (4) tolerance to select vertices close to the common plane. The default atol setting is 0.0012 x the average model dimensions in x, y, and z. For this example, the default is too large and thus we require a smaller value.
A 10x10x10 block is then created. Generally, it is accepted that the DFN domain size should be larger than the rock body of interest. This is because fractures may exist with centroids outside of the rock body that extend into the rock body. These fracture fragments would be missed if the DFN domain size and rock body size were the same. We have accounted for this by creating a DFN domain with limits at pm 50 in the x-, y-, and z-directions.
We can now generate a set of discontinuities (joints) based on the previously created DFN using the following command: block cut dfn name 'my_dfn'. The block is cut using the DFN with name = my_dfn. The resulting 3DEC model is shown in Figure 10.
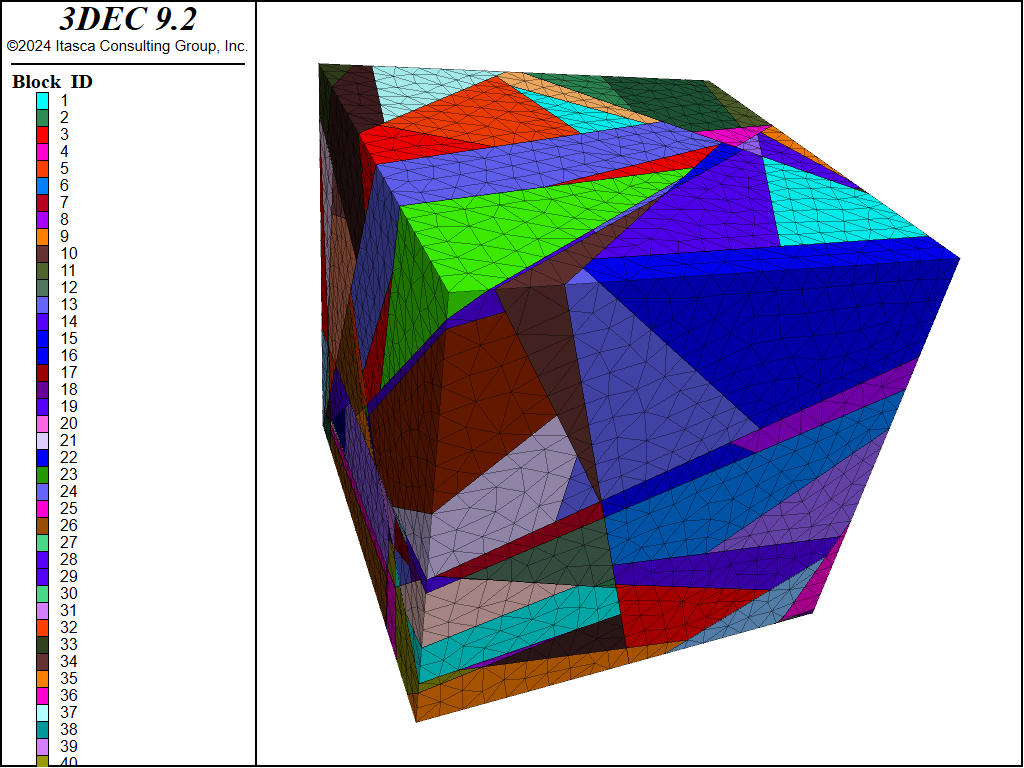
Figure 10: Blocks after cutting
In 3DEC, joints must bisect a block. It is not possible to have a joint partially cut a block. Therefore the cutting of joints with the DFN works as follows:
Joints in the DFN are sorted from largest to smallest
For each joint, all blocks not touching the joint are hidden
Remaining blocks are cut with the joint
Following this procedure minimizes the number of unnecessary cuts; however, many of the joints in the 3DEC model are larger than the corresponding joints in the DFN since cuts must fully bisect blocks. This problem can be resolved by specifying different joint properties on difference sections of the joints.
Before specifying joint properties, we need to discretize the blocks into zones. This will also discretize the joint surfaces and allow different sections of each joint surface to be assigned different properties. Tetrahedral zones of a 1-unit edge length are generated using the command 0.
The joint material properties can now be assigned. The use of specific DFN commands allows for differentiating joint material inside and outside the DFN disk. This idea is illustrated below.
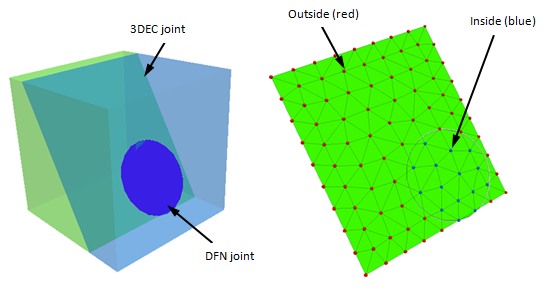
Each 3DEC joint is made up of subcontacts (after zoning). The subcontacts may be either inside or outside of the DFN disk as shown. Different materials properties can be assigned to the inside subcontacts using range dfn-3dec.
Joints can be easily plotted by adding the Joint Plane plot item to a plot. If you only wish to see the parts of the 3DEC joints that correspond to the actual DFN, you can right-click in the Joint Plane plot item in the Plot Item List, select Add Range Element …, and from the Visual list on the left, select DFN Distance. Uncheck the Not checkbox, check the checkbox for my_dfn, and then en ter a Distance slightly greater than 0 (e.g. 0.01). The plot of DFN joints shown look like Figure 12
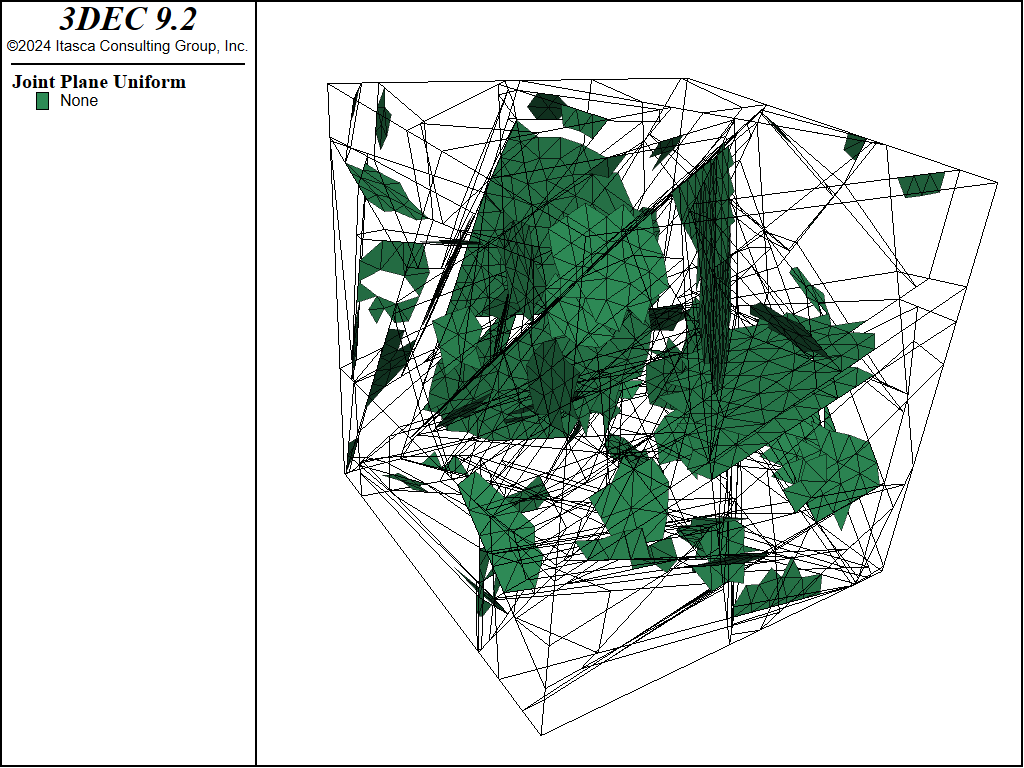
Figure 12: Joints in the model after cutting
dfn.dat
; -- Example to show how to cut joints in 3DEC using a DFN
;
model new
model random 10000
model domain extent -50 50
;
; -- Generate DFN --
fracture template create 'dfn_template' size power-law 3 size-limits 2 20 ...
  position uniform orientation uniform
;
fracture generate dfn 'my_dfn' template 'dfn_template' mass-density 0.1
;
; merge sub-parallel fractures that are close together
fracture combine angle 5 distance 0.1 merge
;
model save 'dfn'
;
===============================================

block tolerance 0.02
;
; create block
block create brick -10 10
;
; add joints corresponding to dfn with id 1
block cut dfn name 'my_dfn'
;
; discretize blocks into tetrahedral zones with an edgelength length of 1.

block zone generate edgelength 1

;
; set joint material properties
block contact property friction 30 cohesion 1000
block contact property cohesion 0 range dfn-3dec 'my_dfn'
;
model save 'blocks'
Creating Internal Boundary Shapes
When fitting the 3DEC model to the problem region, polyhedral boundaries must also be defined to coincide with boundary shapes of the physical problem. These may be internal boundaries representing excavations or holes, or external boundaries representing, for example, man-made structures such as earth dams, or natural features such as mountain slopes. If the physical problem has a complicated boundary, it is important to assess whether simplification will have any effect on the questions that need to be answered (i.e., whether a simpler geometry will be sufficient to reproduce the important mechanisms).
All physical boundaries to be represented in the model simulation (including regions that will be added, or excavations created at a later stage in the simulation) must be defined before the solution process begins. Shapes of structures that will be added later in a sequential analysis must be defined and then “removed” (via the BLOCK EXCAVATE command). Excavated blocks are added with the BLOCK FILL command. Note that only deformable blocks can be excavated and filled.
The cutting of boundary shapes is performed with the following commands:
BLOCK CUT JOINT-SET
BLOCK CUT TUNNEL
BLOCK CUT GEOMETRY
Each command cuts the polyhedra into one or more segments that are fitted together in the desired shape. The block cut joint-set commands create planar joint segments, as discussed in Joints and Joint Sets. The block cut tunnel command cuts a shape into the blocks where the shape is defined by a front and back face. The block cut geometry command cuts the blocks according to an imported geometric surface.
Block Cut Tunnel Command
The block cut tunnel command creates a tunnel whose boundary is formed by planar segments that connect two faces (designated as face-1 and face-2). The shape of the tunnel face is prescribed by an arbitrary number of vertices with coordinates (x1,y1,z1), (x2,y2,z2), (x3,y3,z3), etc. The same number of vertices must exist on both faces; the faces may be positioned either inside or outside of the model.
The example below presents a simple example for the creation of a horseshoe-shaped tunnel. The command block delete is used to delete the tunnel region (defined as group ‘exc’). The resulting tunnel is shown in Figure 13.
Tunnel created with the BLOCK CUT TUNNEL command
model new
block create brick -1.5,1.5  -1.5,1.5  -1.5,1.5

block cut tunnel radial group 'exc'  &
   face-1 (-0.30,-1.5,0.00) (-0.3,-1.5,0.40) (-0.25,-1.5,0.47) &
     (-0.15,-1.5,0.52) ( 0.0,-1.5,0.55) ( 0.15,-1.5,0.52) &
     ( 0.25,-1.5,0.47) ( 0.3,-1.5,0.40) ( 0.30,-1.5,0.00) &
  face-2  (-0.30, 1.5,0.00) (-0.3, 1.5,0.40) (-0.25, 1.5,0.47) &
     (-0.15, 1.5,0.52) ( 0.0, 1.5,0.55) ( 0.15, 1.5,0.52) &
     ( 0.25, 1.5,0.47) ( 0.3, 1.5,0.40) ( 0.30, 1.5,0.00)

block delete range group 'exc'
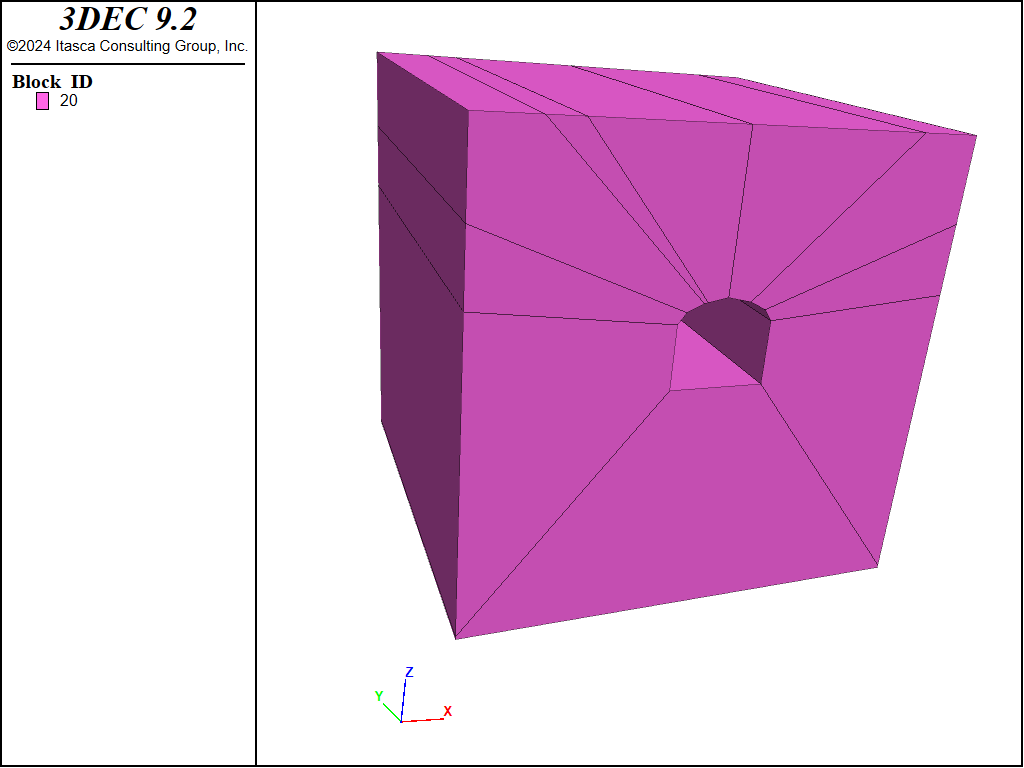
Figure 13: Tunnel created with TUNNEL command
Usually, the model will be brought to an equilibrium state before the tunnel is excavated. The user must be careful that the fictitious joints along the tunnel boundary do not influence model response during the initial equilibrium calculation. If the BLOCK CUT TUNNEL command is used, the blocks are automatically joined at the fictitious joints. If BLOCK CUT JOINT-SET commands are used to create fictitious joints, then it is recommended that the block join command be used to join the blocks separated by the fictitious joint. Use the block contact list to identify whether the contact is a leader-follower (l-f) contact between joined blocks.
Block Cut Geometry Command
The block cut geometry command can be used to cut out even more complicated shapes. Usually a geometric surface is created with a third-party program (e.g. Rhino3D or Autocad) and is imported into 3DEC. A geometric surface is usually a collection of triangles or quadrilaterals that define some continuous 3D surface. File formats accepted by 3DEC are .dxf and .stl. It is also possible to create a geometry surface from within 3DEC using commands and FISH. See the Geometry section in the Program Guide for more details.
Once a geometry has been imported or created, it can be used to cut the 3DEC blocks. Each facet of the geometry surface represents a “joint” and cuts any blocks that it touches. In this way, almost any geometric shape can be cut into a 3DEC model.
WARNING: Complex geometries with a lot of sub-parallel faces will result in a lot of cuts and potentially many thin “sliver” blocks that may cause numerical problems when trying to run the model. It is recommended that geometric surfaces be simplified as much as possible before using them to cut 3DEC models.
Unlike with the tunnel command, blocks cut with the BLOCK CUT GEOMETRY command are not automatically joined. It is up to the user to join “construction” joints after cutting.
An example of using the BLOCK CUT GEOMETRY command is shown below. To use the BLOCK CUT GEOMETRY command, the user must first specify a domain using the domain extent command. The command is followed by lower and upper bounds for the x, y and z dimensions of the model. If only two numbers are givien, it is assumed that the y and z dimensions are the same as the x dimensions. The domain simply needs to be larger than the model. It is required to make the cutting algorithm more efficient. Also with this example, the block tolerance command is used. 3DEC uses a tolerance to decide what blocks can be cut and what blocks cannot be cut. IF two cuts are closer together than the tolerance, than a cut is not made. This is done to prevent the formation of very tiny blocks. By default, the tolerance is 1% of the block size. However for complex shapes such as this one, it is often necessary to reduce the tolerance so that all of the cuts are made. In this case a value of 0.001 is used (the tolerance is in units of length). The geometry to be cut is an ellipsoid as shown in Figure 14. The success of the cutting can be seen in the cross-section view (Figure 15).
model new
model domain extent -10 10
geometry import 'ellipsoid.stl'

block tolerance 1e-3
block create brick -2 2 -2 2 -1 6

block cut geometry 'ellipsoid'
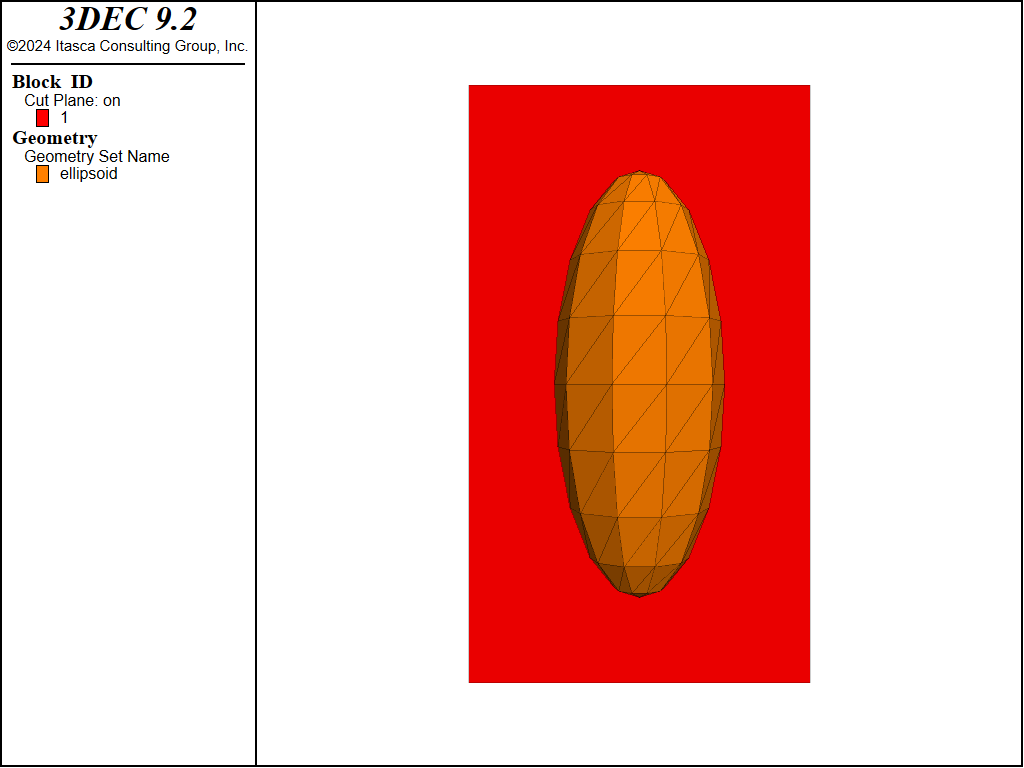
Figure 14: Imported geometry and block before cutting
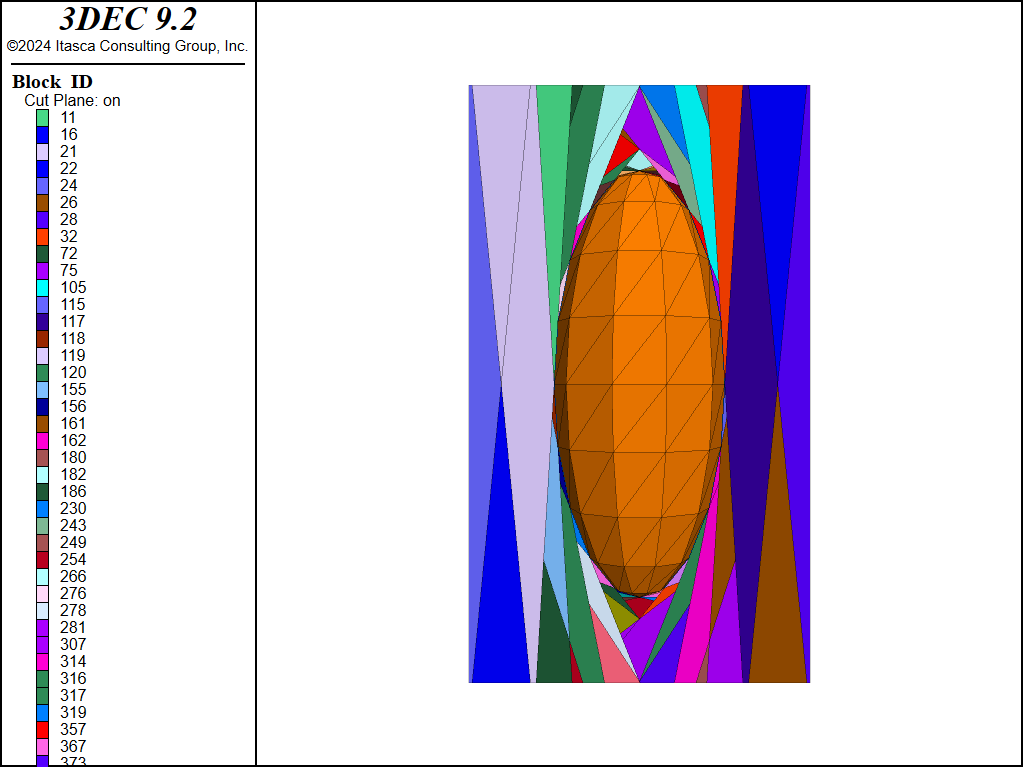
Figure 15: Imported geometry and cross-section of blocks after cutting
| Was this helpful? ... | Itasca Software © 2024, Itasca | Updated: Dec 05, 2024 |
