Plot Item Clip Box
A clip box is composed of three planar extents that share the same center. The size and visibility of each extent may be individually manipulated. When all three are in use, they make up a box, hence the name “clip box.” The plot item is clipped to the portion of the item that is inside the box when the clip box is active.

Show a clip box (make the clip box visible in the plot) by selecting it in the “Plot Item List.” It is removed from view when a different object is selected on the “Plot Item List.”
Activate a cutting tool (turn on its clipping action in the plot) or de-activate by toggling its  button.
Note showing and activating are independent of one another.
A clip box may be copied/pasted onto another plot item. This operation can be performed across plots.
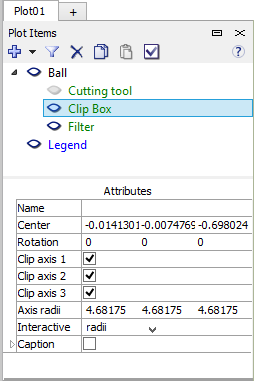
To work with the clip box of a plot item, select it in the upper portion of the control set. The lower Attributes section of the control set (see adjacent image) will show its properties. These may be adjusted in the Attributes section of the control set, or they may be adjusted interactively by operating on the cutting tool within the plot.
To manipulate the clip box without showing its effect on the plot item, de-activate it (toggle  ) but leave the clip box selected in the upper portion of the control set.
Clip Box Attributes
Name: Set the name of the clip box.
Center: Set the position of the clip box’s center.
Rotation: Set the rotation of the clip box.
Clip axis 1: Turn on (checked) or off display of the first clip box axis.
Clip axis 2: Turn on (checked) or off display of the second clip box axis.
Clip axis 3: Turn on (checked) or off display of the third clip box axis.
Axis radii: Specify the length of the first, second, and third (respectively) clip box axes.
Interactive: Specify the current interactive mode in the view. The options are “offsets,” “radii,” and “orientation.” Use of these is described in the next section (below).
Caption: Include (checked) the item caption in the view legend. Sub-attributes provide additional control over the elements contained in the caption and their appearance.
Working on a Clip Box in the Plot
Set the interactive mode as desired using the “Interactive” setting in the Attributes section of the control set. Interactive controls will appear on the view for working with the clip box.

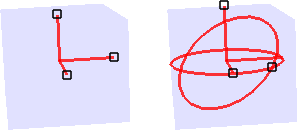
Figure 1: When “offsets” or “radii” are selected, controls appear as at left; when “orientation” is selected, controls appear as at right.
Manipulate the controls as follows.
Offsets: Drag a handle point (  ) to slide the clip box forward or backward along the axis of the control point.
Radii: Drag the handle point of an axis to extend/reduce the extent of the clip box along that axis.
Orientation: Drag a handle point to rotate the clip box around the axial pathway containing the handle point.
When the mouse cursor is moved close enough to a handle point to be able to “grab” it for one of the operations described
above, it will change from an arrow (  ) to a hand (
  ).
).
CS: figure of clipbox needs to be updated to include sync field
| Was this helpful? ... | PFC 6.0 © 2019, Itasca | Updated: Nov 19, 2021 |
