Creating Blocks, Splitting and Deleting
Blocks are polygons with a mesh inside. They can be created from closed (water-tight) polygons using the blocking tool ( ) or auto-blocking tool (
 ). Closed simply-connected polygons with 3- or 4-sides can be meshed using either structured or unstructured mesh; all other polygons are meshed with unstructured mesh only. Examples of various blocks with structured, unstructured and mixed meshes are shown in the animated figure below.
Create a Single Block
Click on the blocking tool button ( ) and move the mouse cursor to be within a closed polygon. If the polygon is highlighted with light-blue color, it can be meshed with structured mesh (if Meshing Parameters have corresponding settings). If the polygon is highlighted with light-purple color, only unstructured mesh can be used to mesh the polygon. Click with the left mouse button to mesh it.
Creating Multiple Blocks
Position the blocking tool outside the area of interest and click-and-drag a selection rectangle around the prospective blocks. On release of the left mouse button, all closed polygons will be meshed. Alternatively, you can use the auto-blocking tool ( ) to mesh all closed polygons within the current Extrusion set.
Creating a Block Using Coordinates
With the blocking tool active, press [spacebar] and enter coordinates. If the coordinates supplied lie within a closed polygon, the polygon will be meshed and a block created.
Note on Blocks with Unstructured Mesh
Any operations that change geometry of any of the elements of a block with unstructured mesh (e.g. moving nodes, changing edge zoning, splitting an edge, etc.) will cause the unstructured mesh to be deleted. You would have to mesh such a block again to account for new geometry. This is different from the blocks with structured mesh for which mesh can be dynamically recreated upon changes of block geometry (except for changing control points position - mesh will be deleted in such a case).
Operations with Blocks with Structured Mesh
Splitting Blocks with Structured Mesh
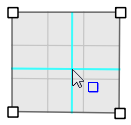
- With the blocking tool active, positioning the tool within a block with structured mesh will show cyan crosshairs that intersect at the mouse point. Click to split the block into the sections indicated. If this operation is performed on an edge, it will split the edge of the block. Note that such a split will propagate in both directions across the model through all attached blocks with structured mesh.

Figure 2: Clicking with the blocking tool within a previously defined block will split the block as indicated by the cyan crosshairs
Splitting a Block with Structured Mesh Using Coordinates
- With the blocking tool active, position the tool within a block with structured mesh to see cyan crosshair indicators. If you press Ctrl + [spacebar], a pop-up property editor will appear with the current coordinates of the mouse pointer entered into the edit field. Enter the desired coordinates for the split and press [Enter] to create the split. (The meshing parameters must allow for creation of a structured mesh.)
Deleting Block (Mesh)
Select a block with the selection tool ( ) and press Delete. To delete multiple blocks, hold Control while left-clicking on a set of blocks to create a multiple-block selection, then press Delete.
Using the Right Mouse Button
While the blocking tool is active, selection functions of the left mouse button transfer to the right button.
You can select a block by right-clicking the block. Holding the Control key down while you right-click will let you add and remove blocks from a multiple selection. You can also use a selection rectangle to select a range of blocks, making sure you click one block first to specify the type of object to include in the selection.
The right mouse button also lets you drag selected objects to new positions.
Right-clicking with the blocking tool lets you select points or edges and then drag them to new positions.
| Was this helpful? ... | 3DEC © 2019, Itasca | Updated: Feb 25, 2024 |

